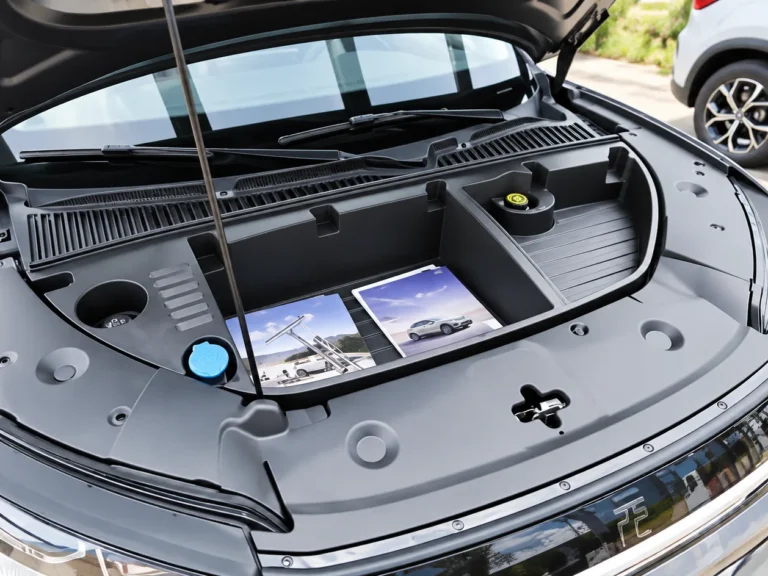




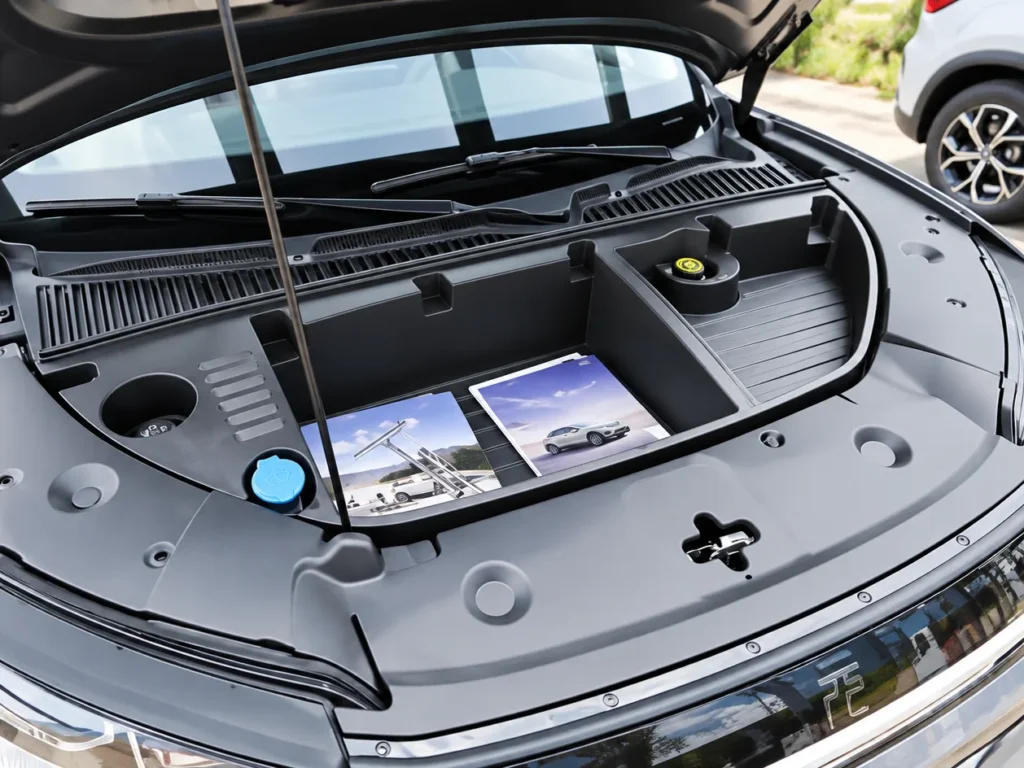
A BYD front trunk storage box installation can make loose items easier to organize, but fitting one may require removing several factory trim panels. A clip or panel pulled in the wrong direction can be damaged, and a box that does not match the car’s mounting points can leave trim sitting unevenly.
This installation guide covers a front trunk storage box for the 2024 BYD Yuan UP. The procedure involves releasing the rear cover retainers and outer panels, lifting out the center and side panels, fitting the box, and reinstalling the fasteners and trim. Use it only if your vehicle and kit match this layout; confirm the exact model year, market version, and box design before starting.
This guide presents ten installation steps, with an illustration for each one. Work with the vehicle switched off on a level surface, keep removed fasteners organized, and stop if a panel or clip does not release with light, even pressure. If the steps or mounting points differ from your vehicle, use the vehicle-specific instructions or ask a qualified BYD technician.
BYD Front Trunk Storage Box Installation: Before You Start
This kit requires partial removal of the factory front-compartment trim. Other front trunk organizers can use a different design, including versions that sit over the existing cover and need fewer parts removed. A BYD owner report describes this difference between Yuan UP frunk kits, so do not assume that every box follows the same removal sequence.
Before unpacking the kit, compare its shape and mounting holes with the vehicle. Check that the product listing names your exact BYD model and model year, and ask the seller to confirm compatibility for your market version. BYD’s owner-manual portal lets owners request a manual for the relevant Yuan UP model; follow your vehicle’s own instructions where they differ from this guide.
Tools and preparation
Prepare a plastic trim removal tool, the correctly sized driver or socket for the fasteners shown, a small tray for clips and screws, and a clean cloth to protect painted edges. Keep the supplied hardware separate from the original screws so they are not mixed up. Do not substitute longer screws or force a fastener that does not start smoothly.
Park on level ground, switch the vehicle off, secure it against movement, and open the front compartment fully. Let hot parts cool. Keep tools, hands, and loose items away from moving or electrical components. Do not touch high-voltage components or wiring. If you find damaged wiring, a loose connector, or a panel that appears to cover electrical equipment, stop and seek professional help.
The BYD service information for front-compartment trim describes releasing clips and refitting the panel in reverse order. It also advises replacing damaged clips. This is general trim guidance, not a Yuan UP accessory-box procedure, so use the instructions supplied with your kit for the exact fasteners and locations.
BYD Front Trunk Storage Box Installation: 10 Steps
Keep the front hood supported throughout the work. The illustrations below have been adapted for clarity, with English step labels. Small visual details may differ from the original hardware, so use the actual kit instructions and mounting points as your reference.
Product Used In This Guide:
Step 1: Release the six rear cover retainers
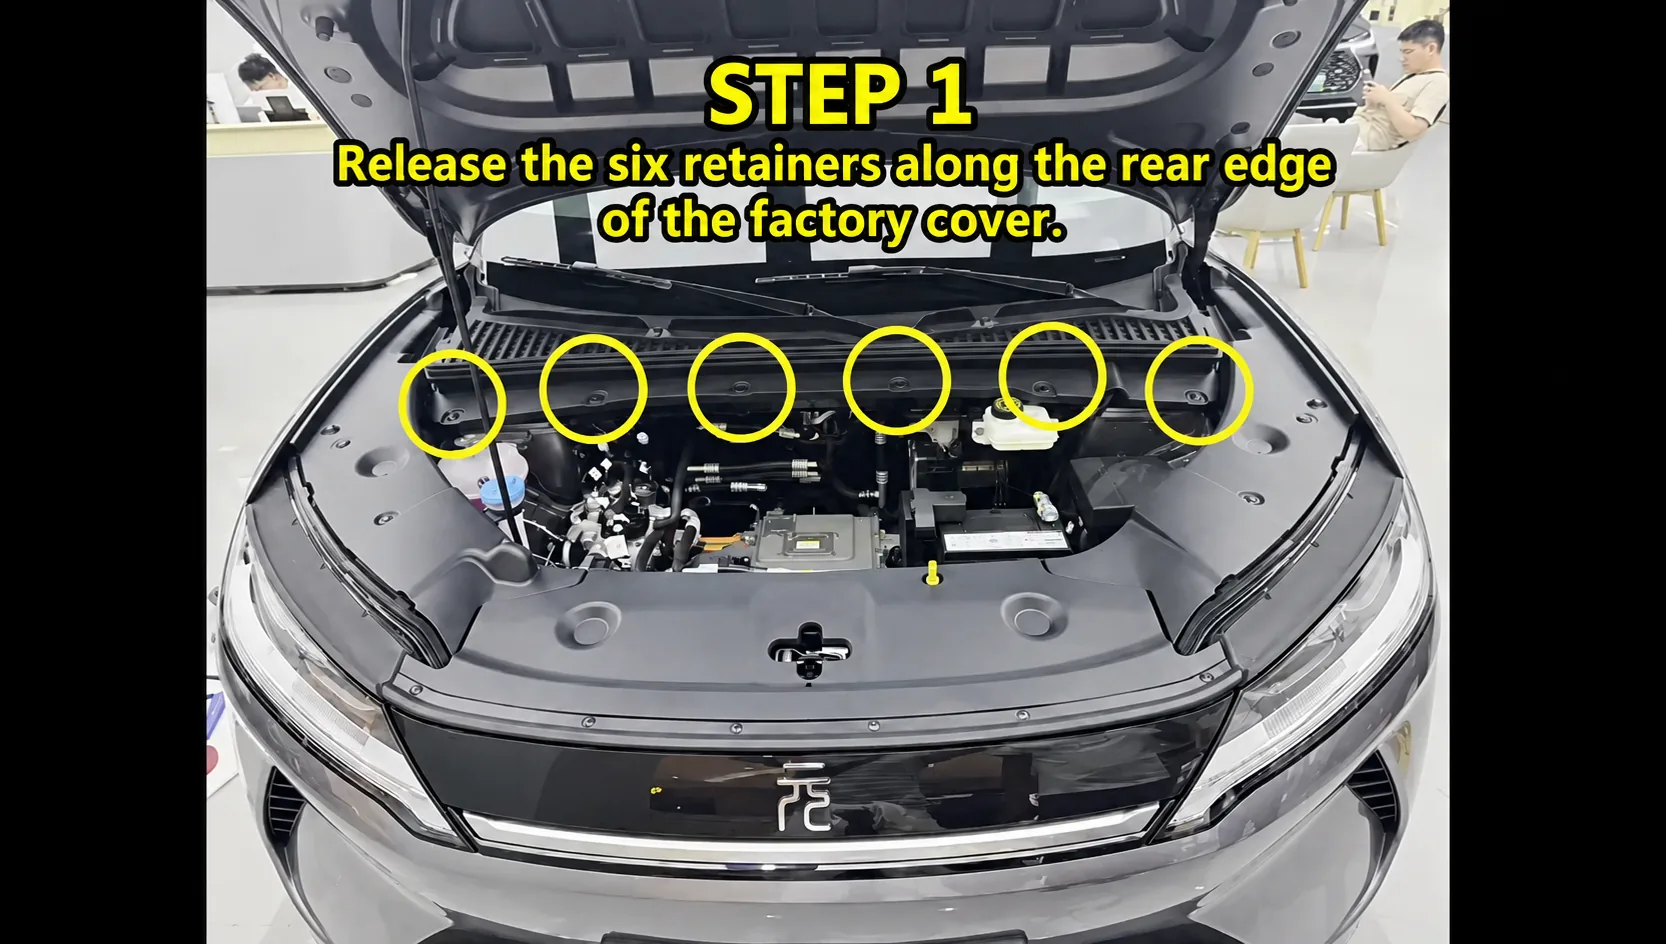
At the windshield side of the front compartment, locate the six retainers marked in the illustration. Release each retainer with the appropriate trim tool or driver for its design. Keep them together and note their original positions. Do not pry against the glass or pull up on the panel while a retainer is still engaged.
Step 2: Release the outer trim clips
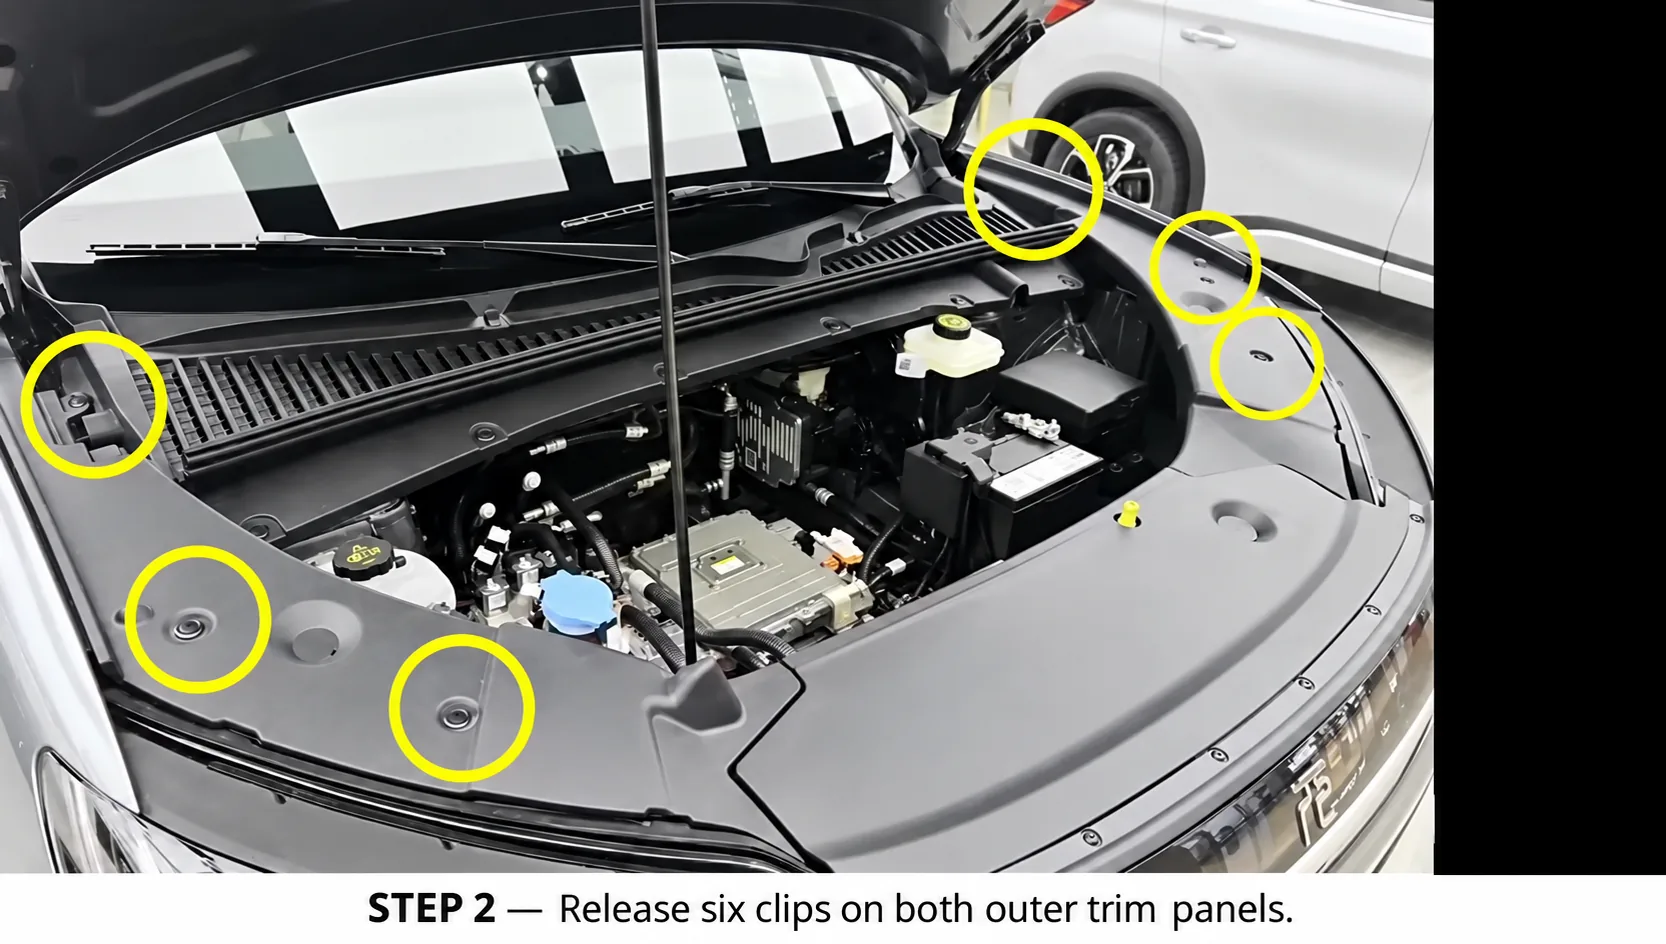
Release the six marked clip positions across the left and right outer trim panels. Work from one edge at a time and support the panel as the clips disengage. If a clip stays in the vehicle body, remove it carefully and return it to the panel before refitting; replace clips that are cracked or deformed.
Step 3: Lift out the center protective panel
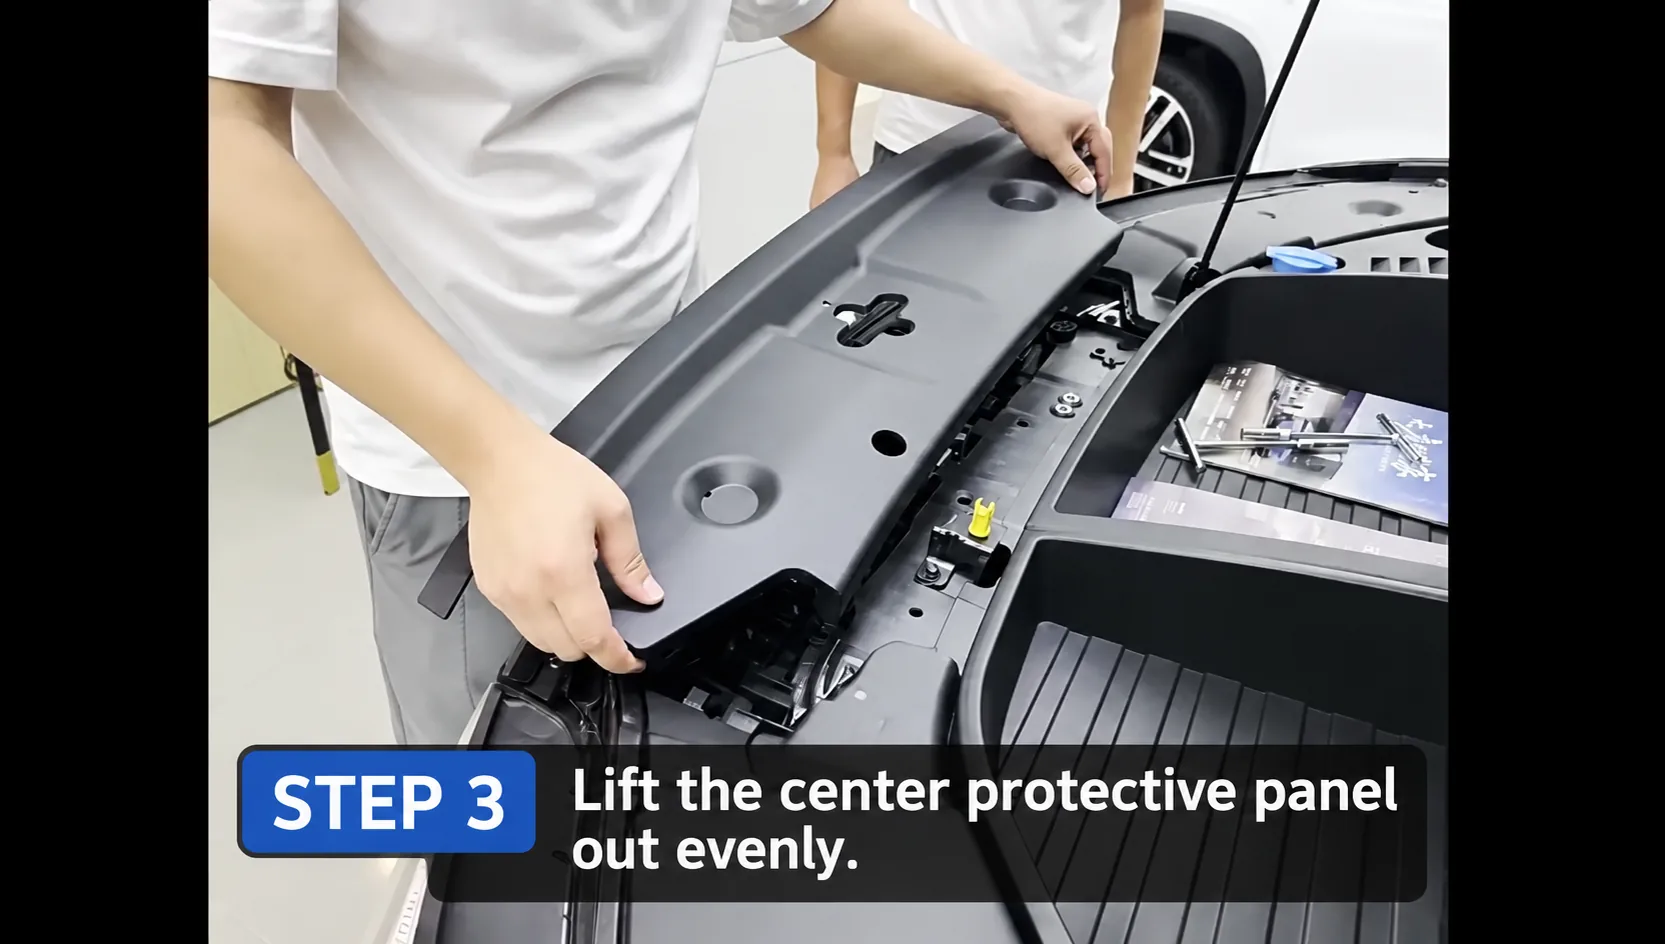
With the retaining points released, lift the center panel out evenly as shown. Keep it level so its tabs do not catch on neighboring trim. Set it on a clean surface with its clips facing up, and avoid placing weight on its edges.
Step 4: Remove the left and right side baffles
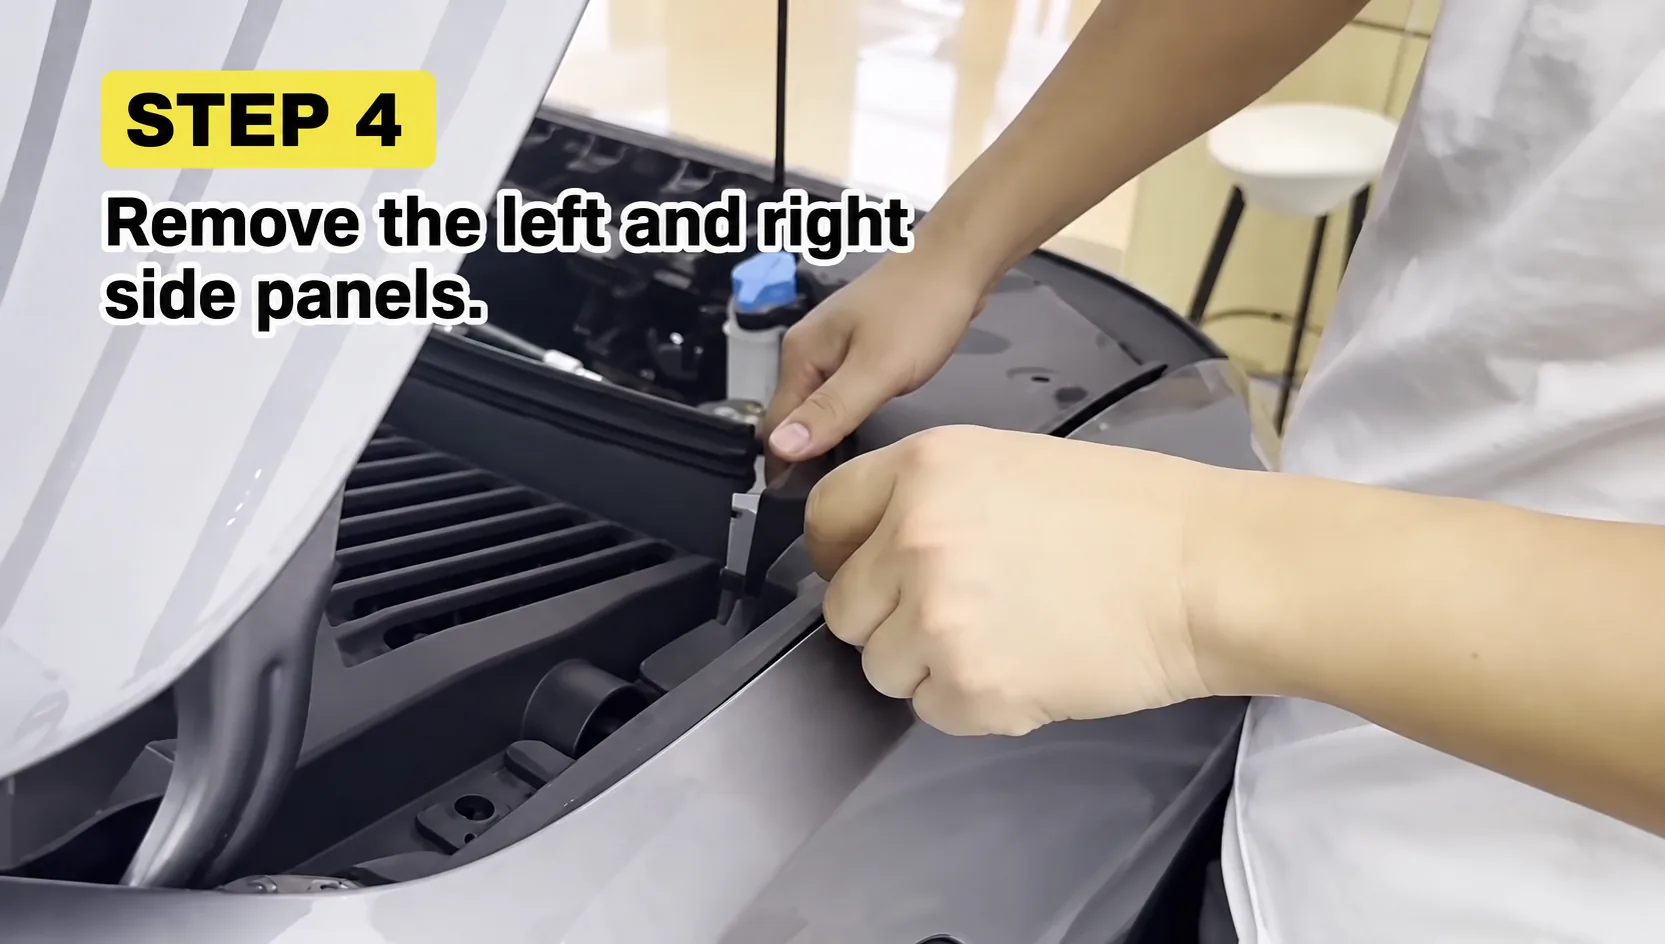
Remove the two side baffles or panels shown for this kit. Check for any remaining fastener before lifting each piece away. Label left and right if their shapes are similar, and store them where they will not be scratched.
Step 5: Remove the four marked factory screws
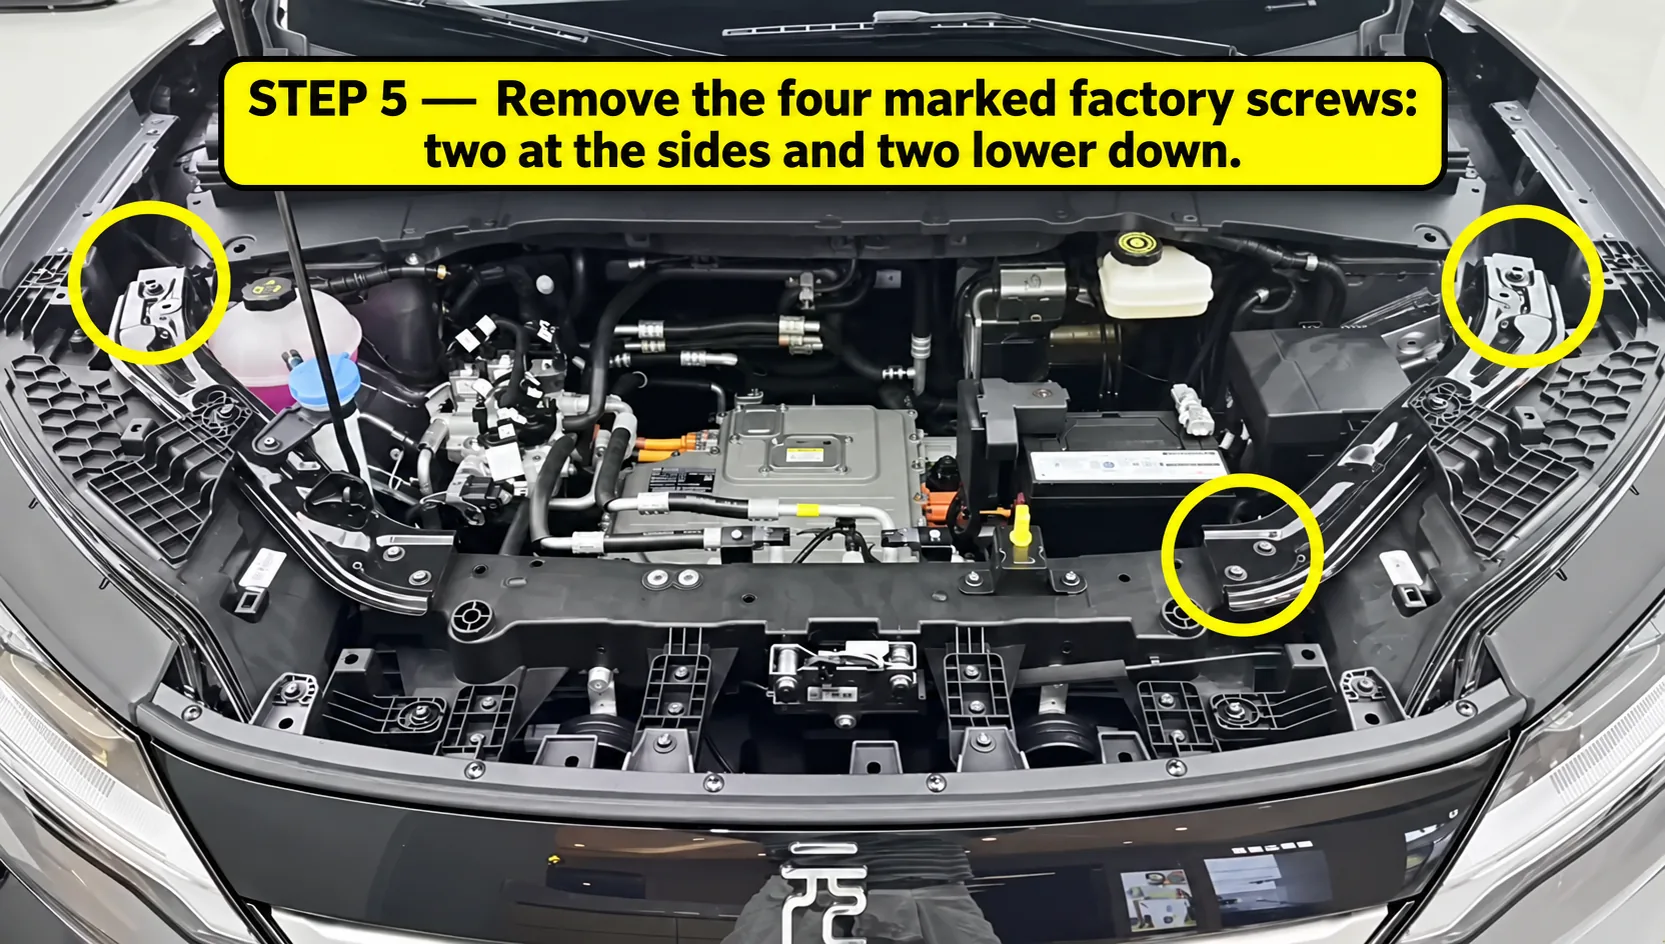
The four screws marked in the illustration are positioned two toward the center sides and two lower down. Remove only those fasteners for this kit, and place them in a separate tray. If the screw count or pattern on your car differs, pause and verify the instructions rather than removing additional hardware.
Step 6: Start the box corner fasteners
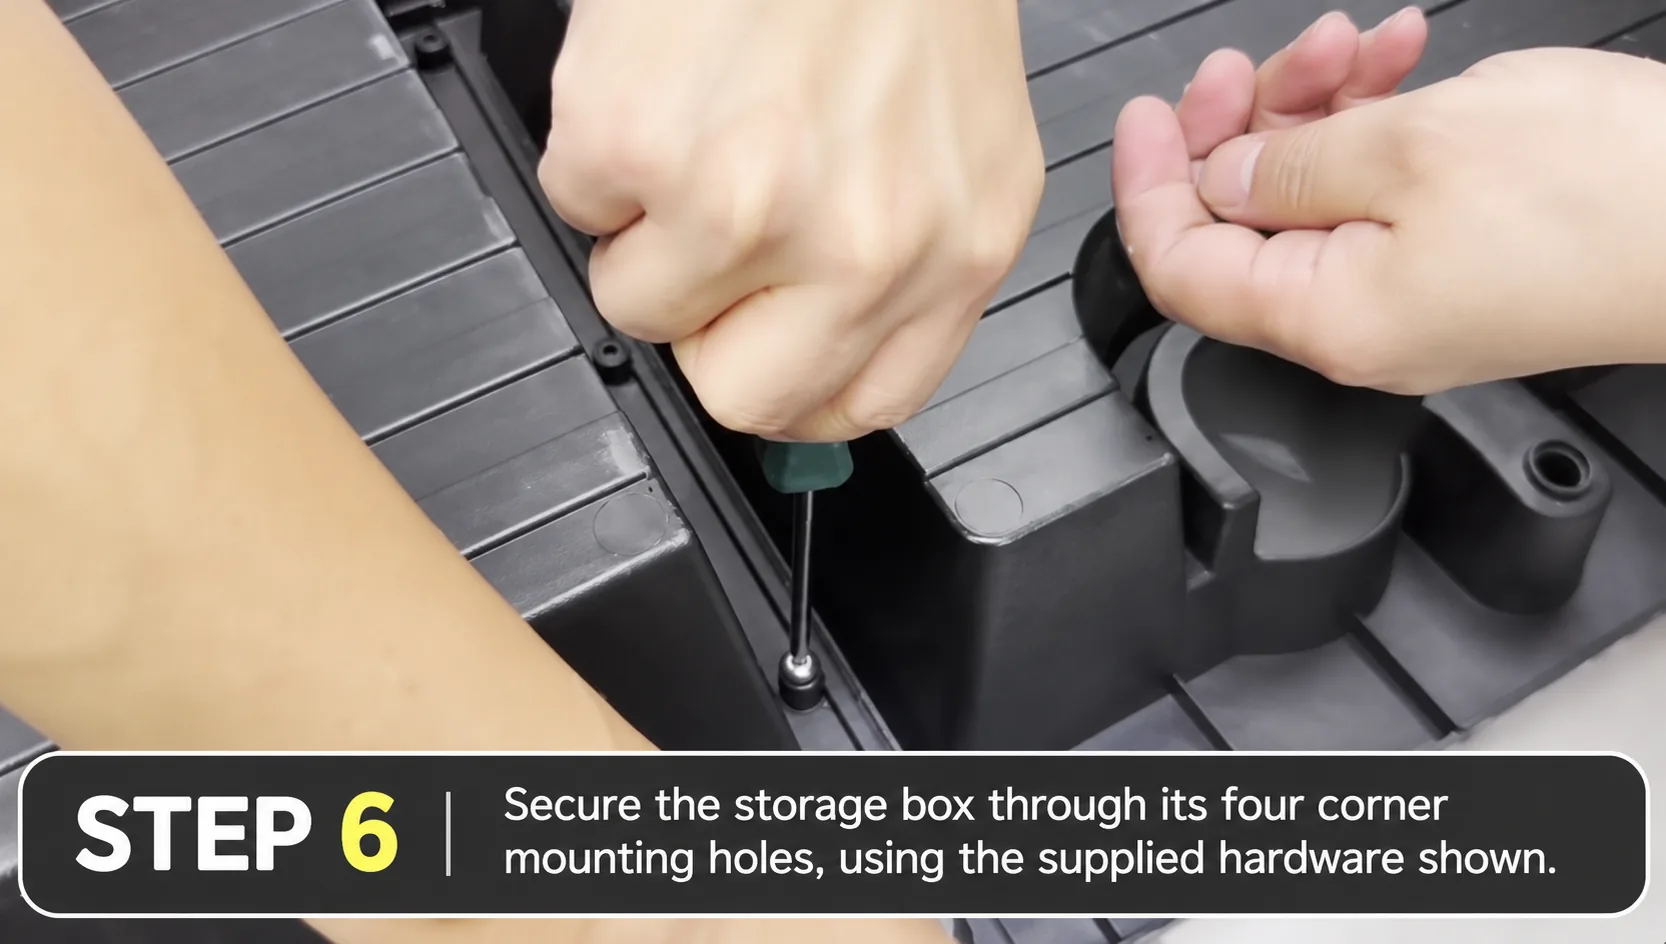
Use the hardware supplied with the kit to start the fasteners through the box’s four corner mounting holes, as shown. Keep each screw square to its hole and turn it by hand for the first few threads if possible. Leave the fasteners slightly loose until the box is seated and aligned; tightening one corner fully too early can pull the other mounting points out of line.
Step 7: Lower the box into the compartment
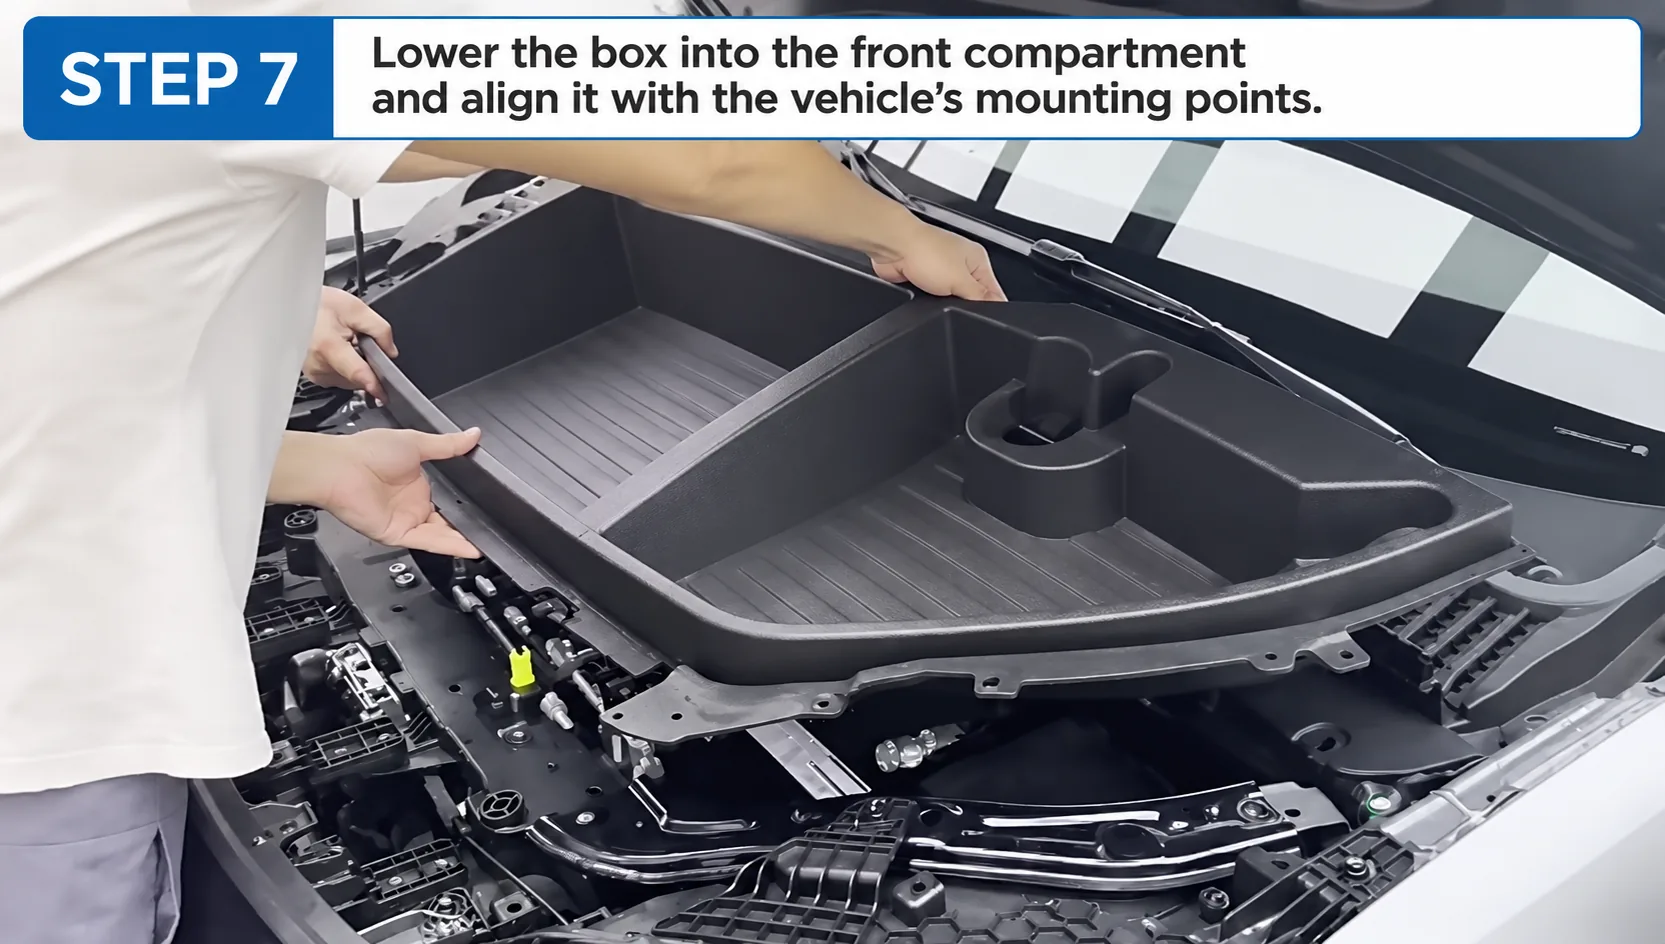
Lower the box into the front compartment without dragging it across the surrounding trim. Align its molded edges and mounting points with the vehicle. Check that it sits flat and does not press against hoses, wiring, caps, or other components. If it rocks or needs force to line up, lift it out and check the orientation and fitment.
Step 8: Reinstall the four original screws
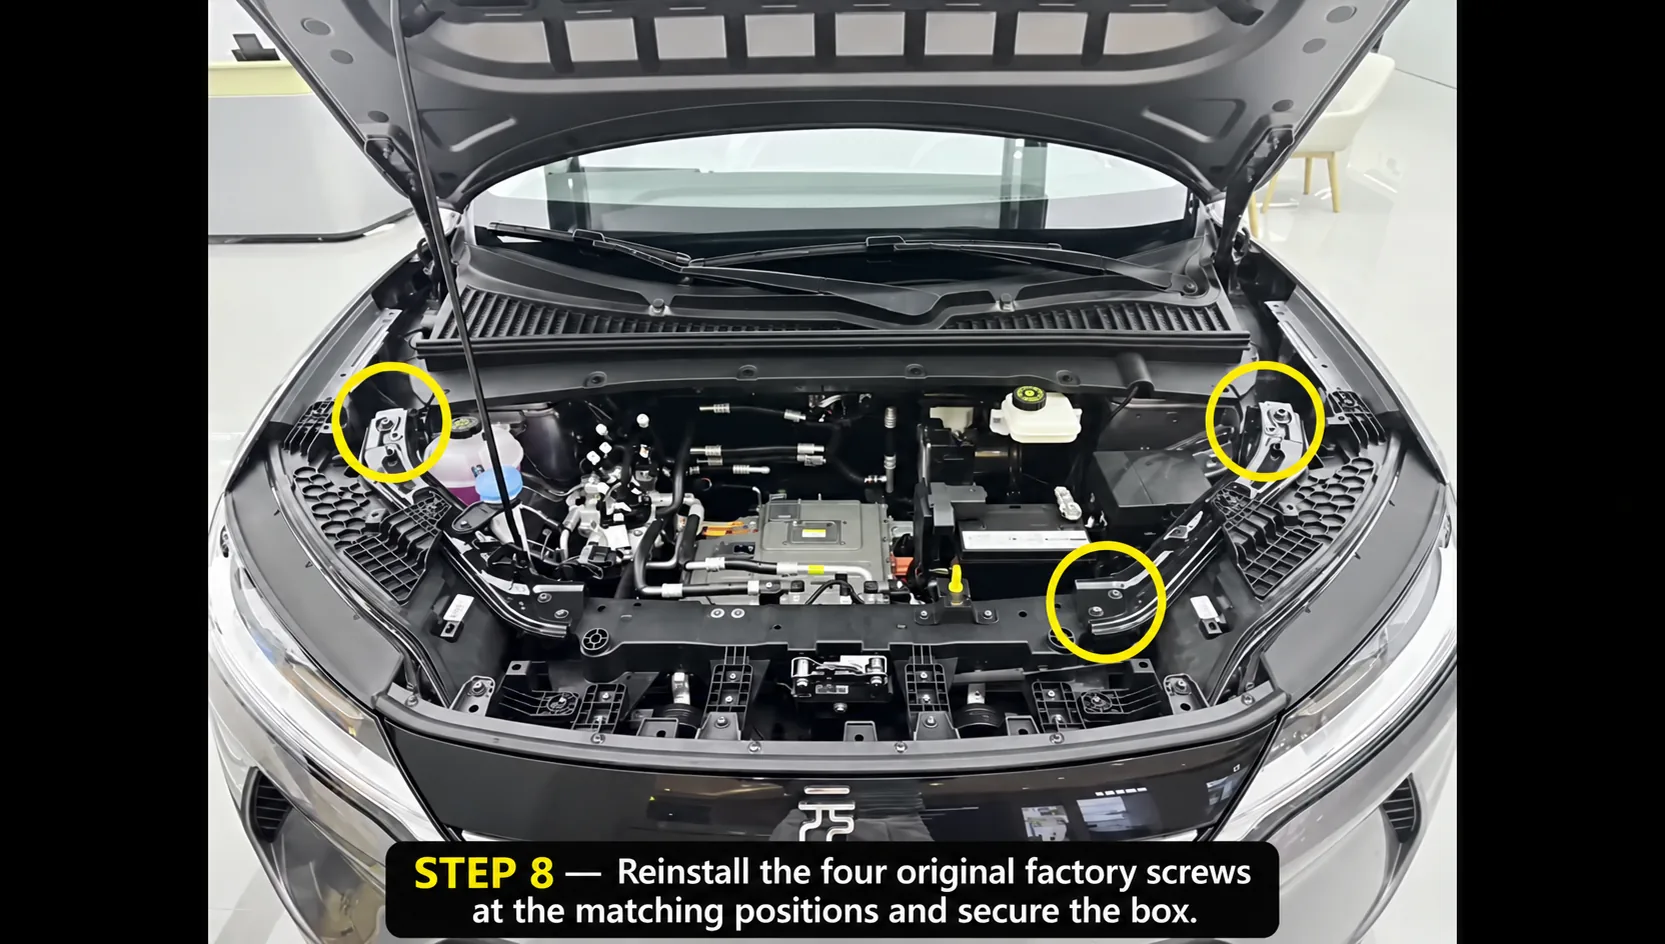
Refit the four original factory screws at the matching positions identified during removal. Start all fasteners before tightening them. Tighten them evenly and only to a secure fit; do not overtighten plastic mounting points. If the kit instructions specify different hardware or torque, follow those instructions.
Step 9: Refit the six rear retainers
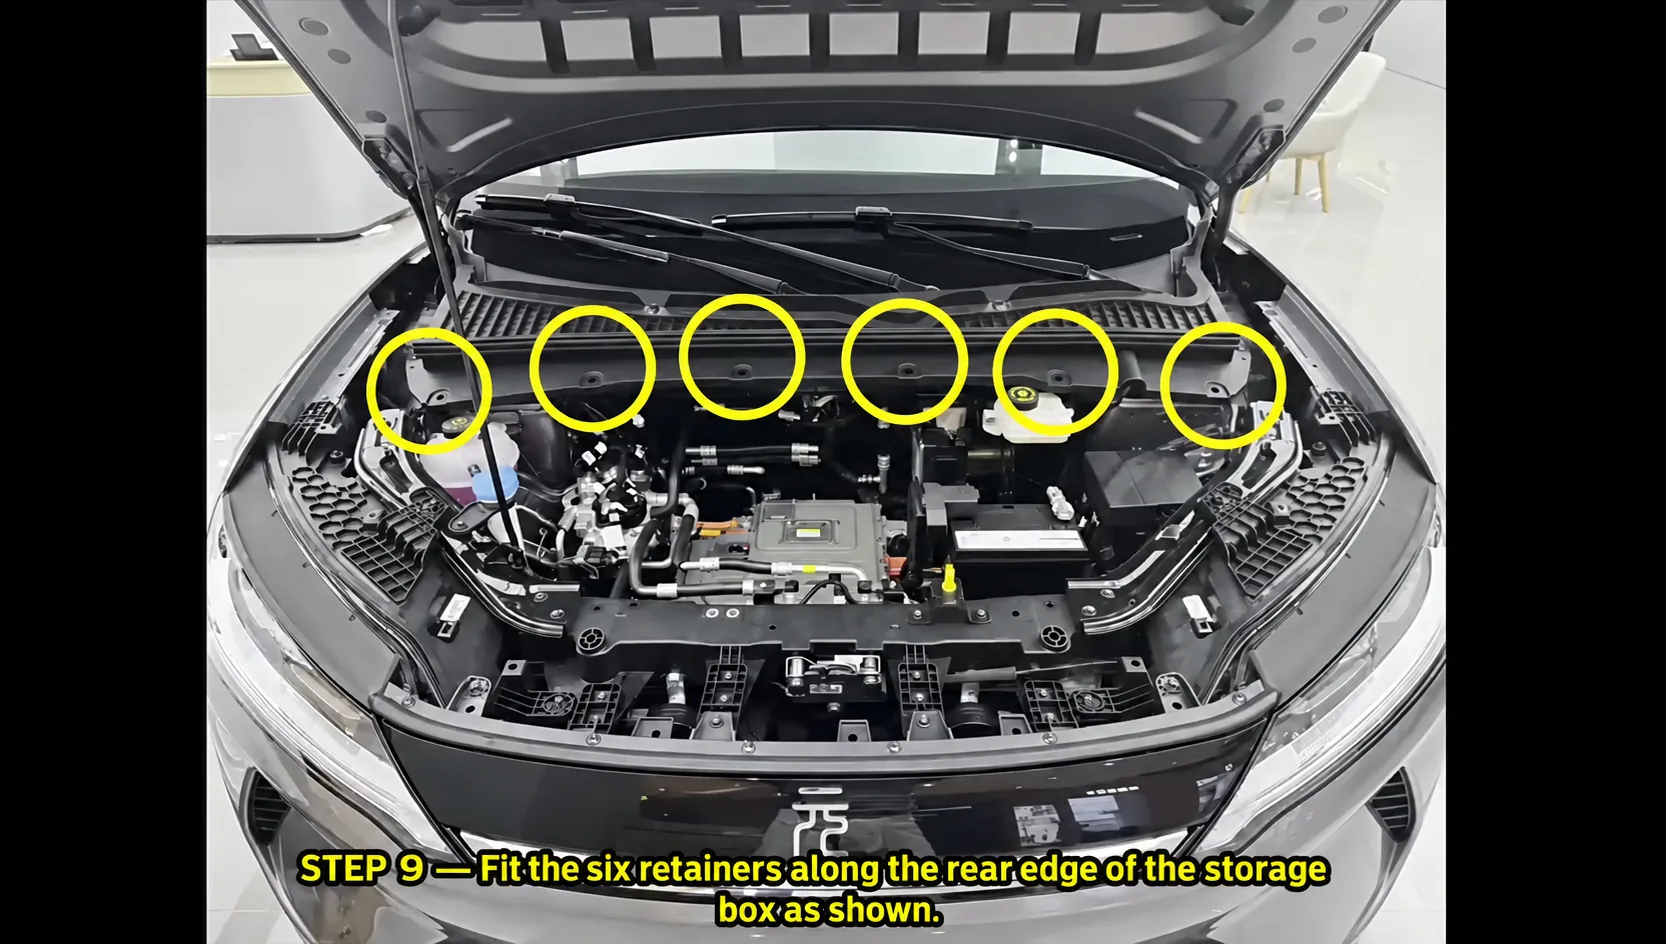
Press the six retainers into their matching positions along the rear edge of the storage box or cover, following the illustrated layout. Each should sit flush and hold without rocking. A retainer that will not seat may be misaligned, damaged, or the wrong type; remove it and check rather than forcing it.
Step 10: Reinstall the three protective panels
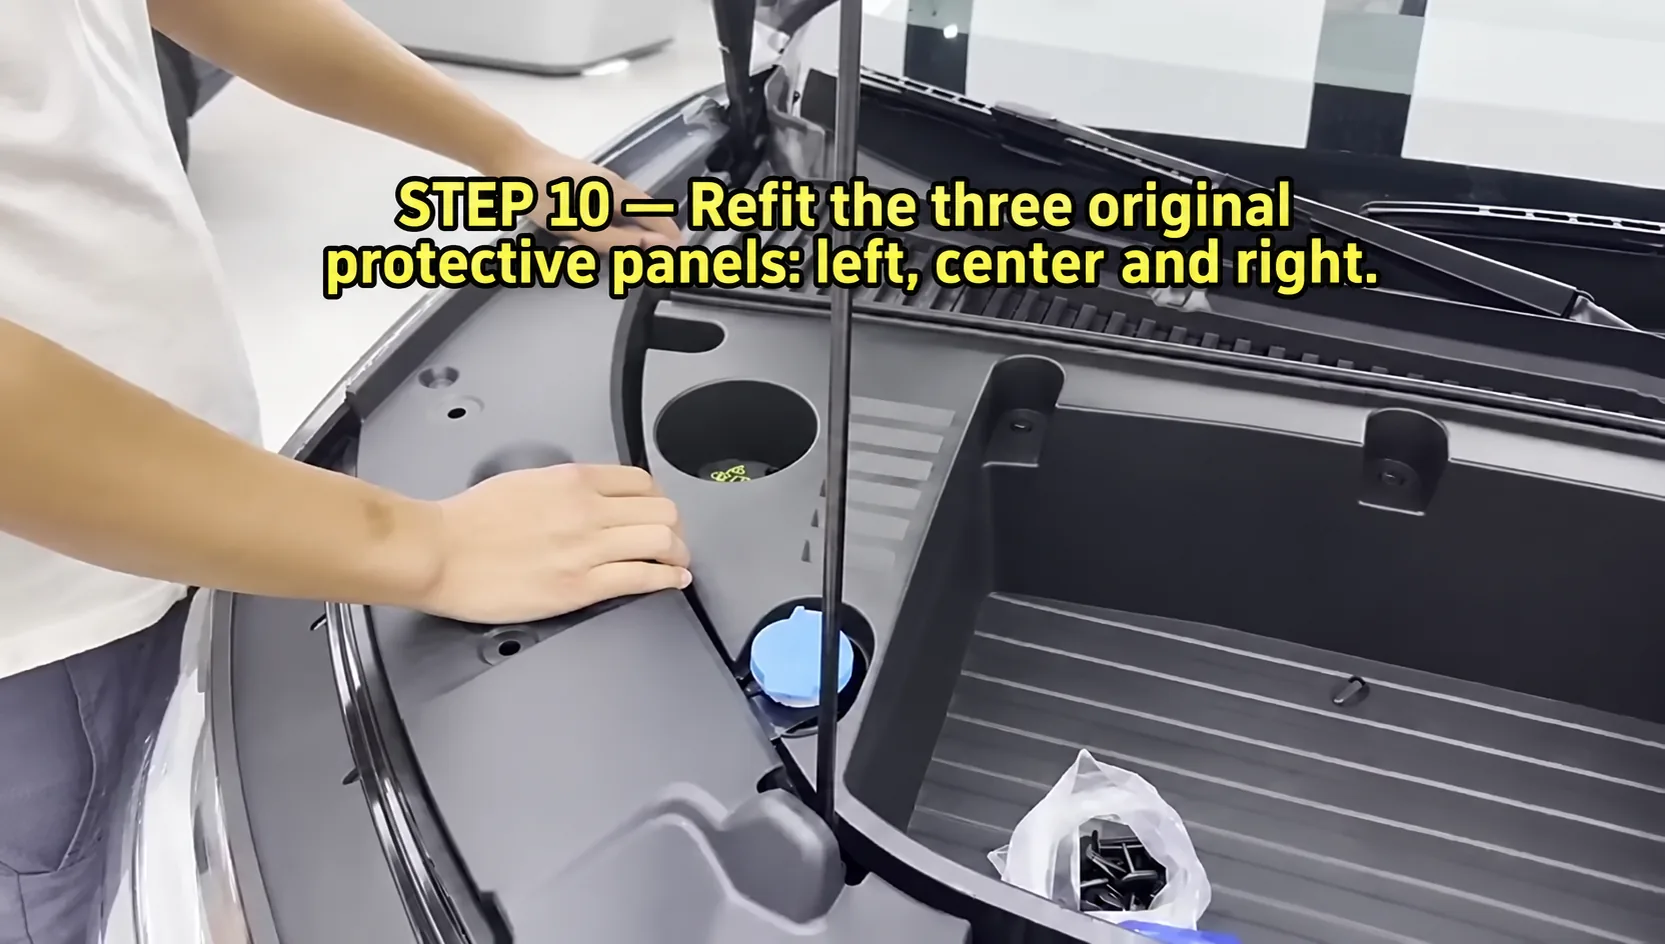
Refit the left, center, and right protective panels removed earlier. Align their tabs first, then press the clips home with even pressure. Reinstall the rear cover retainers removed in Step 1 if the kit design uses that cover. Check every panel edge for a flush fit and confirm that no clip or screw is left over.
Final checks after installation
Before closing the front hood, look around the full perimeter of the box. Confirm that the original and supplied fasteners are in their intended locations, the panels are secure, and no wire, hose, cap, or service point is trapped or obstructed. Remove every loose tool and fastener from the compartment.
Close the hood according to the vehicle manual, then reopen it and check that nothing has shifted. Do not load the box until you have confirmed that it is secure and that the front compartment closes normally. Use the organizer only for items appropriate for the product and vehicle; do not place heavy or loose objects where they could interfere with servicing or become a hazard.
A general BYD body-kit installation guide covers the same useful habits for trim work: confirm the application, dry-fit parts, protect the paint, and check each clip before final reassembly. For a broader overview of checking BYD accessory fitment, see the BYD body kit guide. These articles cover exterior accessories, so use them for general fitment planning rather than as instructions for this frunk kit.
Frequently Asked Questions
Does this procedure fit every BYD Yuan UP?
No. This guide covers a specific 2024 Yuan UP and kit layout. Model year, regional version, and accessory design can change the trim or mounting points, so confirm your exact application first.
Can I install a front trunk box without removing the trim?
Some box designs may sit over existing panels and require fewer parts to be removed. This procedure requires trim removal, so check the instructions for the exact product you purchased before beginning.
What should I do if a plastic clip breaks?
Do not leave a panel loose or replace a missing retainer with an improvised screw. Use a matching replacement clip and confirm the panel sits flush. BYD service guidance also says damaged clips should be replaced.
Do I need to disconnect the 12-volt battery?
This procedure does not include a battery-disconnection step. Follow the instructions for your vehicle and accessory kit; if either requires electrical work or battery isolation, have a qualified technician handle it.
How do I check whether the box fits my car?
Share the vehicle model, model year, market version, and clear photos of the front compartment and mounting points with the seller. YIROX can review the application and provide a fitment response or quote; include the product listing or box photos so the exact design can be checked.
Request a BYD fitment check
Before ordering a BYD front trunk storage box, confirm the car and kit together. Send YIROX the model year, market, product link or photos, and pictures of the mounting area. We can review the requested application and quote the matching item if it is available.
References
- BYD Perú, Owner’s Manual request portal — select the applicable vehicle and year to request the relevant Yuan UP manual.
- BYD Service Information, Removal and installation of left trim panel assembly of front compartment — general clip-release and reverse-installation guidance for front-compartment trim.
- Autohome Yuan UP owner forum, Front and rear trunk modification installation discussion — an owner notes that different front trunk box designs may require different trim removal.