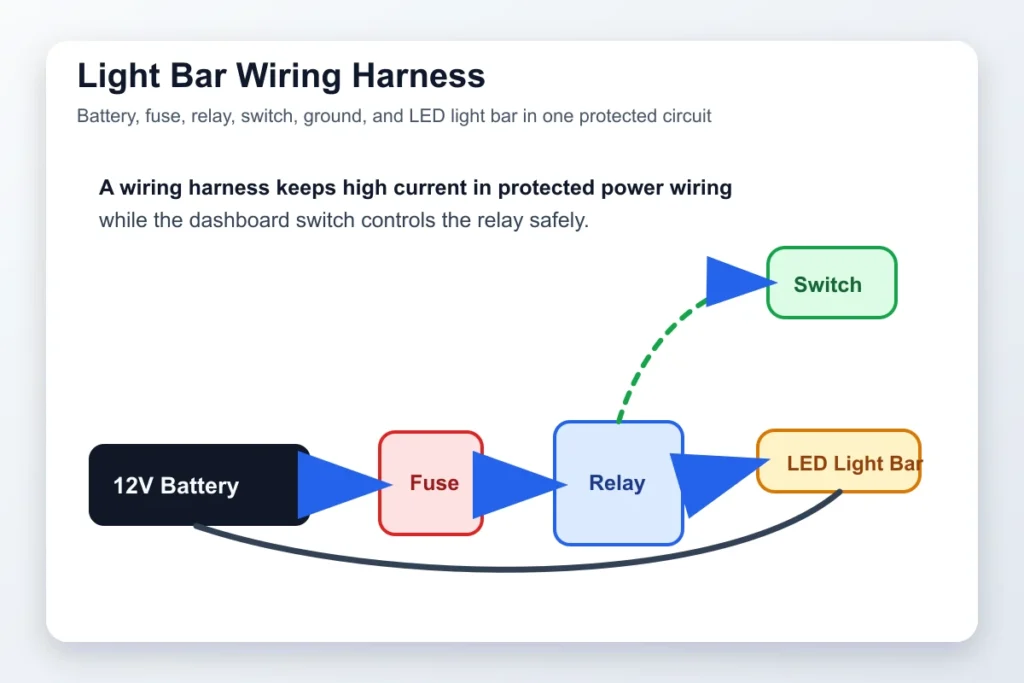
A light bar wiring harness is a pre-arranged set of wires, connectors, a fuse, a relay, and a switch that lets an LED light bar draw power safely from a vehicle’s electrical system. It keeps high current out of the dashboard switch, protects the circuit from shorts, and gives the installer a cleaner path from battery to light bar.
For off-road drivers, installers, and accessory buyers, the harness is not a small afterthought. A good light bar can still flicker, overheat wiring, blow fuses, or fail early if the harness is undersized or routed badly.
Table of Contents
- What is a light bar wiring harness?
- What parts are included in a light bar wiring harness?
- How does a relay wiring harness work?
- Which light bar wiring harness type should you choose?
- How do you choose the right wire gauge, fuse, and relay?
- How do you install a light bar wiring harness safely?
- What should buyers check before sourcing light bar harness kits?
- Conclusion: Treat the harness as part of the lighting system
- Frequently Asked Questions
- References
What is a light bar wiring harness?
A light bar wiring harness is the dedicated electrical circuit that powers and controls an auxiliary LED light bar. Instead of running a light bar directly through a small dash switch, the harness uses heavier power wires for the load and lighter control wires for the switch.
That separation is the main reason a harness exists. LED light bars often draw more current than a simple interior accessory, especially larger double-row bars, roof bars, or multiple-light setups. A relay harness lets the switch trigger the circuit while the battery-side wiring carries the real load.
The harness also makes installation more repeatable. Most kits include ring terminals for the battery, an inline fuse holder, a relay socket, a switch, output leads, and lamp-side connectors. If the reader is still comparing the lighting hardware itself, the related guide to off-road LED light bars explains how size, mounting position, beam pattern, and wiring work together.
For road-use vehicles, the harness should not bypass lighting rules or factory safety functions. NHTSA treats extra forward lighting as supplemental lighting and says it must not impair required lighting equipment when installed as original equipment 1.
What parts are included in a light bar wiring harness?
A typical light bar wiring harness includes battery leads, an inline fuse, a relay, a switch, output wires, connectors, and ground points. Better kits also include protective sleeving, sealed plugs, strain relief, mounting hardware, and labels that make the circuit easier to inspect.

The battery leads connect the harness to the power source. The positive lead should pass through the fuse before reaching the relay, while the negative lead returns to the battery or a clean chassis ground.
The inline fuse protects the wiring if the positive side shorts to ground. Its job is not to protect the light bar from every possible failure; it protects the conductor before the wire overheats. This is why fuse placement near the power source is so important.
The relay is an electrically controlled switch. It lets the dashboard switch energize a low-current coil, which closes a higher-current path from battery to light bar. The switch may be a rocker, OEM-style switch, or trigger wire connected to an ignition, high-beam, or auxiliary control circuit where legal and appropriate.
The lamp connector matters more than many buyers expect. DT-style connectors are common on smaller light bars and pods, while heavier-duty connectors may be used where current draw is higher. For readers choosing the light output side at the same time, the related guide to spot, flood, and combo LED light bar beam patterns helps separate wiring needs from visibility needs.
How does a relay wiring harness work?
A relay wiring harness works by using one circuit to control another circuit. The low-current switch circuit activates the relay coil, and the relay closes the higher-current battery-to-light-bar circuit.

In a common 12V setup, battery positive goes through the fuse to relay terminal 30, terminal 87 sends power to the light bar, terminal 85 goes to ground, and terminal 86 receives the switch trigger. Some kits vary, so the included diagram still matters.
This layout keeps heavy current out of the cabin switch. Super Bright LEDs describes relay harnesses as taking the current load instead of feeding full current to the dash switch, and notes that inline fuse holders protect the vehicle circuit 3. iJDMTOY’s guide follows the same broad pattern: connect the lamp leads, connect battery positive and negative, route the switch, then test the circuit 4.
The relay also makes troubleshooting cleaner. If the light bar does not turn on, the installer can test the fuse, relay click, switch trigger, battery voltage, ground continuity, and lamp connector one by one.
Which light bar wiring harness type should you choose?
Choose the harness type based on current draw, number of lights, connector style, vehicle voltage, switch plan, and environment. The right harness should fit the load and be easy to inspect later.
| Harness type | Best use | Main advantage | Watch-out |
|---|---|---|---|
| Single-output harness | One light bar or one pair wired as a single load | Simple layout and fast installation | Must match the bar’s current draw |
| Dual-output harness | Two pods or two small bars | Cleaner than two separate circuits | Both outputs may share one fuse and relay |
| High-current harness | Large bars or multi-light setups | Heavier wire, larger fuse, stronger relay | Needs careful routing and heat protection |
| Switch-panel harness | Builds with several accessories | Centralized control and future expansion | Requires disciplined labeling and circuit planning |
| Vehicle-specific harness | OEM-style installs | Better switch fit and cleaner routing | Less flexible across vehicle models |
Connector and sealing quality should match the environment. A dry-road show build and a mud, rain, snow, or farm-vehicle build do not stress the harness the same way. If the customer already cares about waterproof housings, the related guide to IP ratings for LED lights is useful because connectors and cable entries can become weak points.
Vehicle voltage is another basic filter. Many light bars accept a wide input range, but the harness, relay, switch illumination, and fuse choice still need to match the actual system. A 24V truck or equipment installation should not be treated as a 12V pickup install with bigger confidence.
How do you choose the right wire gauge, fuse, and relay?
Start with the light bar’s wattage or rated current, then choose wire, fuse, and relay for the real current and cable length. Watts divided by system voltage gives a quick estimate, so a 120W light bar on 12V draws about 10A before losses.
Wire size depends on current and total run length, not just the light bar label. Long roof runs, rear work lights, and multi-light circuits can lose voltage if the wire is too small. Engineering ToolBox gives 3% voltage drop as a common design limit for 12V conductor sizing, which is only 0.36V on a 12V circuit 5.
Fuse size should be above normal operating current but below the safe capacity of the wire. Oversizing the fuse because “it keeps blowing” is a warning sign, not a repair.
Relay rating should also exceed the load with margin. Many light bar harnesses use 30A or 40A automotive relays, but the label alone is not enough. Check terminal quality, socket fit, heat exposure, and whether the relay is sealed or protected from water splash.
For retail or private-label programs, match harness families to product families. A 6-inch bar, 20-inch bar, and 50-inch bar should not quietly share the same light-duty harness unless the current, connector, and wire length support it. If the next step is selecting compatible hardware, the related off-road LED light bar product range is the right place to align light size, beam pattern, bracket, and harness expectations.
How do you install a light bar wiring harness safely?
Install a light bar harness by planning the route first, disconnecting power, mounting the light, routing protected wiring, connecting the relay and fuse, grounding properly, installing the switch, and testing before final tightening.

First, decide where the light bar, relay, fuse holder, switch, and ground will sit. Keep wiring away from exhaust heat, sharp brackets, steering parts, belts, fans, hood hinges, and areas where cargo or tools can crush the cable. Use existing firewall grommets when possible.
Second, mount the light bar and leave enough slack for aiming. Route the lamp-side harness along factory wiring paths where practical, then secure it with clips or cable ties. Super Bright LEDs warns that chafing can cause a short circuit and recommends securing wiring after routing 3.
Third, connect the fuse holder close to the positive power source, mount the relay in a protected location, and make a clean ground connection. Paint, rust, loose fasteners, and thin sheet metal can all create voltage drop or intermittent faults. If grounding to the chassis, scrape to clean metal where appropriate, tighten the fastener, and protect the area against corrosion.
Fourth, route the switch wiring into the cabin or to the control panel. If the light is triggered by high beam, reverse light, ignition, or another factory circuit, verify legality, current limits, and whether the vehicle uses sensitive body-control electronics. Commercial motor vehicle rules also distinguish auxiliary lamps from required headlamps and say auxiliary driving lamps or fog lamps cannot satisfy headlamp requirements 2.
Finally, test the circuit before trimming ties and reinstalling panels. Confirm the switch works, the relay is not buzzing, the fuse does not heat, the wiring does not rub, and the light bar stays stable after aiming.
What should buyers check before sourcing light bar harness kits?
Buyers should check electrical rating, connector match, wire material, insulation, fuse and relay quality, switch style, labeling, packaging, and batch consistency before sourcing light bar harness kits.
For Yirox Team sample reviews, the practical checks are simple but strict: confirm the wire gauge, inspect terminal crimping, pull lightly on connectors, check fuse holder fit, compare cable length against the installation claim, and confirm that the harness matches the light bar’s wattage.
Packaging also matters. Installers should not have to guess which connector goes to the battery, lamp, switch, or trigger. A small wiring diagram, fuse rating, voltage range, and connector type can reduce returns and avoidable mistakes.
For brands building broader accessory lines, related branded automotive and NEV accessories show why labeling, customization, carton strength, and repeatable quality checks matter across more than one product. A wiring harness is hidden after installation, but its quality becomes visible the moment the light flickers, the switch gets warm, or the customer opens the box and finds unclear leads.
Conclusion: Treat the harness as part of the lighting system
A light bar wiring harness is the safe link between the vehicle battery, control switch, relay, fuse, and LED light bar. It protects the circuit, keeps high current out of the dash switch, simplifies installation, and makes the lighting setup easier to diagnose later.
The best harness is not always the biggest-looking kit. It is the one sized for the light bar’s current, long enough for the vehicle route, protected against vibration and moisture, labeled clearly, and matched to the connector and switch plan. For buyers, installers, and distributors, that means checking the harness before approving the light bar package, not after complaints arrive.
When the harness, light bar, bracket, beam pattern, and product labeling are reviewed together, the finished accessory feels safer and more professional.
Frequently Asked Questions
Do you need a wiring harness for an LED light bar?
Most LED light bars should use a dedicated wiring harness with a fuse and relay. Very small lights may draw little current, but a harness gives cleaner routing, safer circuit protection, and better switch control.
Can you wire a light bar directly to a switch?
It is usually a bad idea to run a medium or large light bar directly through a dashboard switch. A relay harness lets the switch handle a low-current trigger while the relay and heavier wiring handle the light bar load.
What size fuse does a light bar wiring harness need?
The fuse depends on the light bar current and the wire capacity. Estimate current by dividing watts by system voltage, then choose a fuse that supports normal operation while still protecting the wire during a short.
Why does my light bar wiring harness have a relay?
The relay allows a small switch circuit to control a higher-current power circuit. This reduces heat and stress at the switch and keeps heavy current in the engine-bay wiring instead of the cabin.
Is a waterproof connector necessary for a light bar harness?
For off-road, farm, snow, rain, and work vehicles, sealed connectors are strongly recommended. Water and mud often attack the connector or cable entry before the LED housing itself fails.
References
[1] National Highway Traffic Safety Administration. (2019). *FMVSS No. 108 interpretation on supplemental lighting*.
[2] FindLaw. (2025). *49 CFR 393.24 Requirements for head lamps, auxiliary driving lamps and front fog lamps*.
[3] Super Bright LEDs. (2017). *How to Install Light Bars for Off-Road Vehicles*.
[4] iJDMTOY. *General Installation Guide for Wiring Relay Harness with On Off Switch*.
[5] Engineering ToolBox. *12 Volt – Amps vs. Wire Gauge: Choosing the Right Wire Size*.