



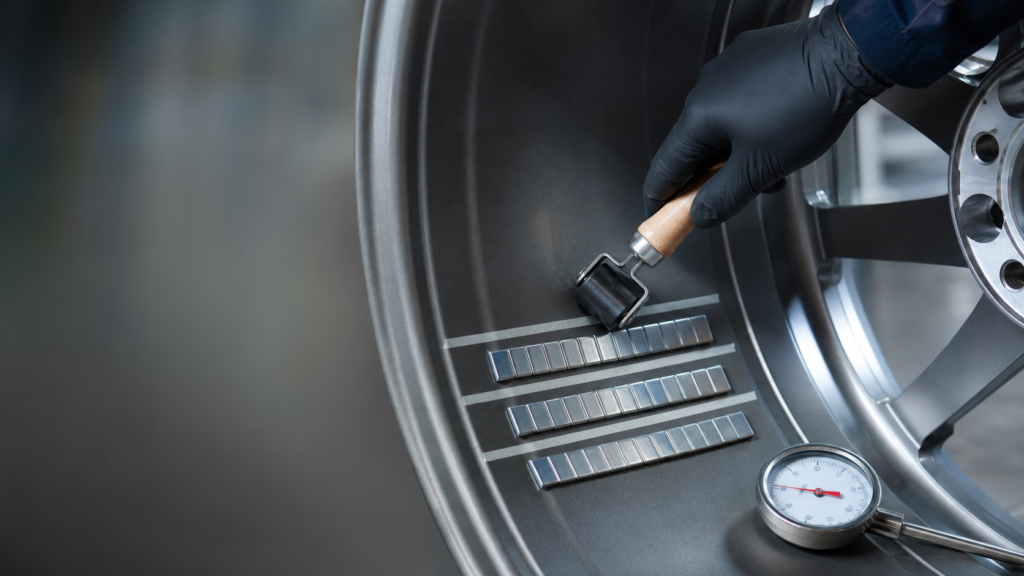
A wheel weight adhesion test plan should compare stick-on samples on the buyer’s intended rim finish, using the same cleaning method, temperature, application pressure, and observation period. Define the acceptance criteria before testing, record every condition, and evaluate the complete installation process rather than treating a generic tape demonstration as proof of field performance.
An adhesion test is most useful when it answers a purchasing question: which proposed strip, tape system, or application instruction is reliable for the wheels and service conditions we actually support? It is not a substitute for a supplier’s technical data or a universal claim about peel strength. A controlled buyer-side comparison reveals whether the proposed product and process are repeatable on representative rims.
Table of Contents
- What should an adhesion test prove?
- How should buyers choose representative samples?
- What conditions must be controlled?
- How should buyers run a practical adhesion test?
- How should results be inspected and interpreted?
- What should buyers record and agree before testing?
- Conclusion: Compare the process, not just the strip
- Frequently Asked Questions
- References
What should an adhesion test prove?
An adhesion test should prove that a candidate stick-on weight and its installation process work consistently on the intended wheel surface. It should compare identifiable samples under conditions that resemble normal service, then produce a record a buyer and supplier can both review.
Start by defining the scope. Are you comparing two tape constructions, checking a new low-profile strip, qualifying a new supplier, or validating an approved sample before repeat production? The answer determines the rims, conditions, sample quantity, observations, and acceptance rules. Before that decision, use the wheel-weight selection decisions before sample testing to confirm that adhesive attachment is appropriate for the wheel applications in scope.
The plan should not promise a universal pass number. Wheel coatings, barrel geometry, tire-shop practices, temperature, storage, and the intended correction location vary. A valid test instead asks a tighter question: under our documented conditions, do these samples remain fully fitted, show acceptable edge condition, and support the intended balancing workflow better than the agreed alternative?
Before applying samples, clean removal and rim preparation establish a controlled starting surface so the test is measuring the proposed adhesive system rather than old residue or contamination.
How should buyers choose representative samples?
Buyers should choose samples that reflect the parts and wheels they expect to order and service, not a convenient strip cut from a generic roll. Include the proposed material, segment pattern, coating, tape, liner, and packaging form. If multiple profiles or thicknesses are under consideration, identify each one clearly.
Use representative wheels or rim sections with the finishes and shapes that create the highest risk: painted alloy barrels, textured areas, tight radii, deep barrels, or models with limited continuous landing surfaces. A flat coupon can be a supplementary comparison, but it should not become the only evidence for a wheel-specific decision.
The attachment choice also needs to be realistic. The article on when an adhesive attachment format fits the rim can help teams separate a flange-fit problem from an adhesive-performance question. If a rim does not offer a suitable adhesive landing zone, a stronger tape sample does not solve the underlying fitment issue.
For each candidate, retain the carton or lot identification, the strip’s visible construction, and a small unused control piece. Request stick-on wheel-weight samples in enough quantity to test more than one rim and condition. One successful application can be useful evidence; it is not a comparison plan.
What conditions must be controlled?
The test must control the factors that influence tape contact so differences can be attributed to the samples rather than to random handling. At a minimum, keep the rim surface, cleaning sequence, drying condition, temperature, handling, application pressure, and observation timing consistent within a comparison group.
3M’s wheel-weight guidance identifies dust and fluids as risks to tape performance and calls for a clean, dry application area.1 Its surface-prep instructions likewise describe removing grease, oil, dirt, brake dust, and tape residue before taped wheel-weight application.2 Those principles make the preparation method a test variable only when you intentionally compare it; otherwise, standardize it.
| Condition | What to document | Why it matters |
|---|---|---|
| Rim sample | Wheel ID, finish, barrel location, visible texture or curvature | Confirms the test represents the intended substrate |
| Cleaning | Product, cloth/pad, sequence, and drying observation | Prevents contamination from hiding tape differences |
| Working conditions | Approximate wheel and room conditions | Makes seasonal or workshop differences traceable |
| Sample identity | Supplier, product code, lot, profile, and segment layout | Connects the result to the exact proposal |
| Application | Placement, liner handling, pressure tool or method | Controls real contact across the strip |
| Observation | Check times, photos, edge condition, and removal evidence if applicable | Creates comparable evidence rather than memory |
Do not turn this into an artificial laboratory protocol unless the purchase specification requires one. The aim is a controlled, relevant service simulation. If a buyer needs formal performance testing to a named method, the method, laboratory, sample preparation, and acceptance criterion should be agreed separately with qualified parties.
How should buyers run a practical adhesion test?
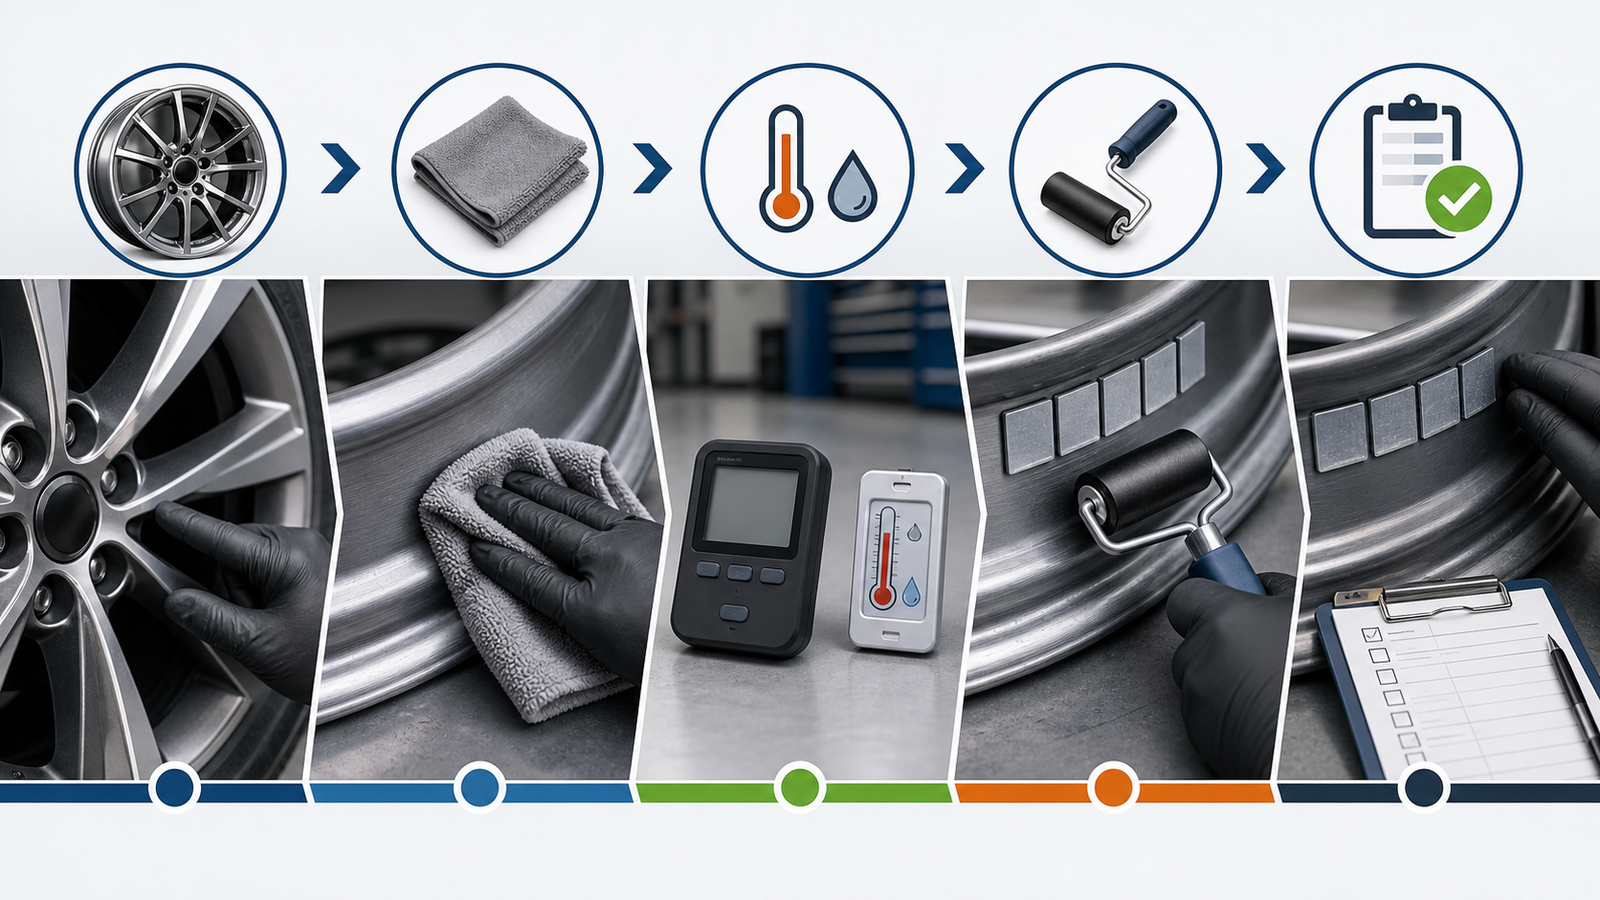
Buyers should run a practical test by applying each candidate to a clean, dry, representative landing surface using the same documented process. Use a small written test card so the operator does not unknowingly change conditions from one sample to the next.
- Select and identify each rim or rim section before cleaning. Photograph the intended landing surface if that helps compare geometry later.
- Remove old tape, brake dust, oils, and loose contamination. Clean the exact strip location and allow it to dry according to the cleaner and tape guidance.
- Record the practical environment and sample identity. Keep unopened samples and wheels in conditions that do not create an avoidable difference.
- Align the strip on a continuous surface, remove the liner immediately before placement, and avoid touching the exposed adhesive.
- Apply consistent pressure across the full length with the agreed hand, roller, or fixture method. Check both ends for full contact.
- Inspect at the pre-agreed intervals, documenting any lift, bridge, movement, contamination, or finish issue. Include samples that remain satisfactory as well as those that do not.
The timing should match the decision. A short initial check can catch poor contact or a wrong mounting surface. A longer agreed observation can reveal whether a condition that looked acceptable initially remains stable. Do not present one dwell period as universally correct; follow the tape supplier’s guidance and the buyer’s actual service needs.
How should results be inspected and interpreted?
Inspect results against the pre-agreed acceptance criteria, then diagnose the full interface when a sample differs. A lifted edge may indicate contamination, inadequate pressure, a bridged feature, unsuitable temperature, handling of exposed adhesive, or tape construction. It is not automatically proof that a whole product line has failed.
Record visual evidence at consistent angles and lighting where possible. Note whether an edge lifts, the strip follows the wheel curvature, any residue is transferred, and whether the wheel finish changes. If a sample must be removed for investigation, retain the strip and photograph the rim surface before cleaning it again.
Compare like with like. A sample on a smooth painted barrel should not be ranked directly against a different sample installed over a casting transition. If one group differs, repeat the comparison with the suspected variable controlled. This protects both the buyer and supplier from a conclusion based on an uncontrolled surface or installation change.
The adhesive result is only one part of a balanced wheel. When the trial includes a mounted assembly, confirm the intended correction with a final wheel-and-tire balancing check after installation. A tape sample that remains attached but is applied outside the balancer’s intended plane is not a successful service outcome.
What should buyers record and agree before testing?
Buyers should agree the comparison scope, required evidence, and acceptance decision before samples are applied. A clear record prevents a successful first strip from being disconnected from the production profile, handling instruction, or lot that will actually be supplied.
Capture these essentials:
- candidate product, tape system, profile, segment layout, and lot or carton identification;
- representative wheel surfaces and the proposed mounting zones;
- cleaner and preparation steps, including the dry-state confirmation;
- handling and pressure method;
- observation schedule and photo locations;
- pass, review, and fail indicators agreed for the program;
- any follow-up trial required when a result is inconclusive.
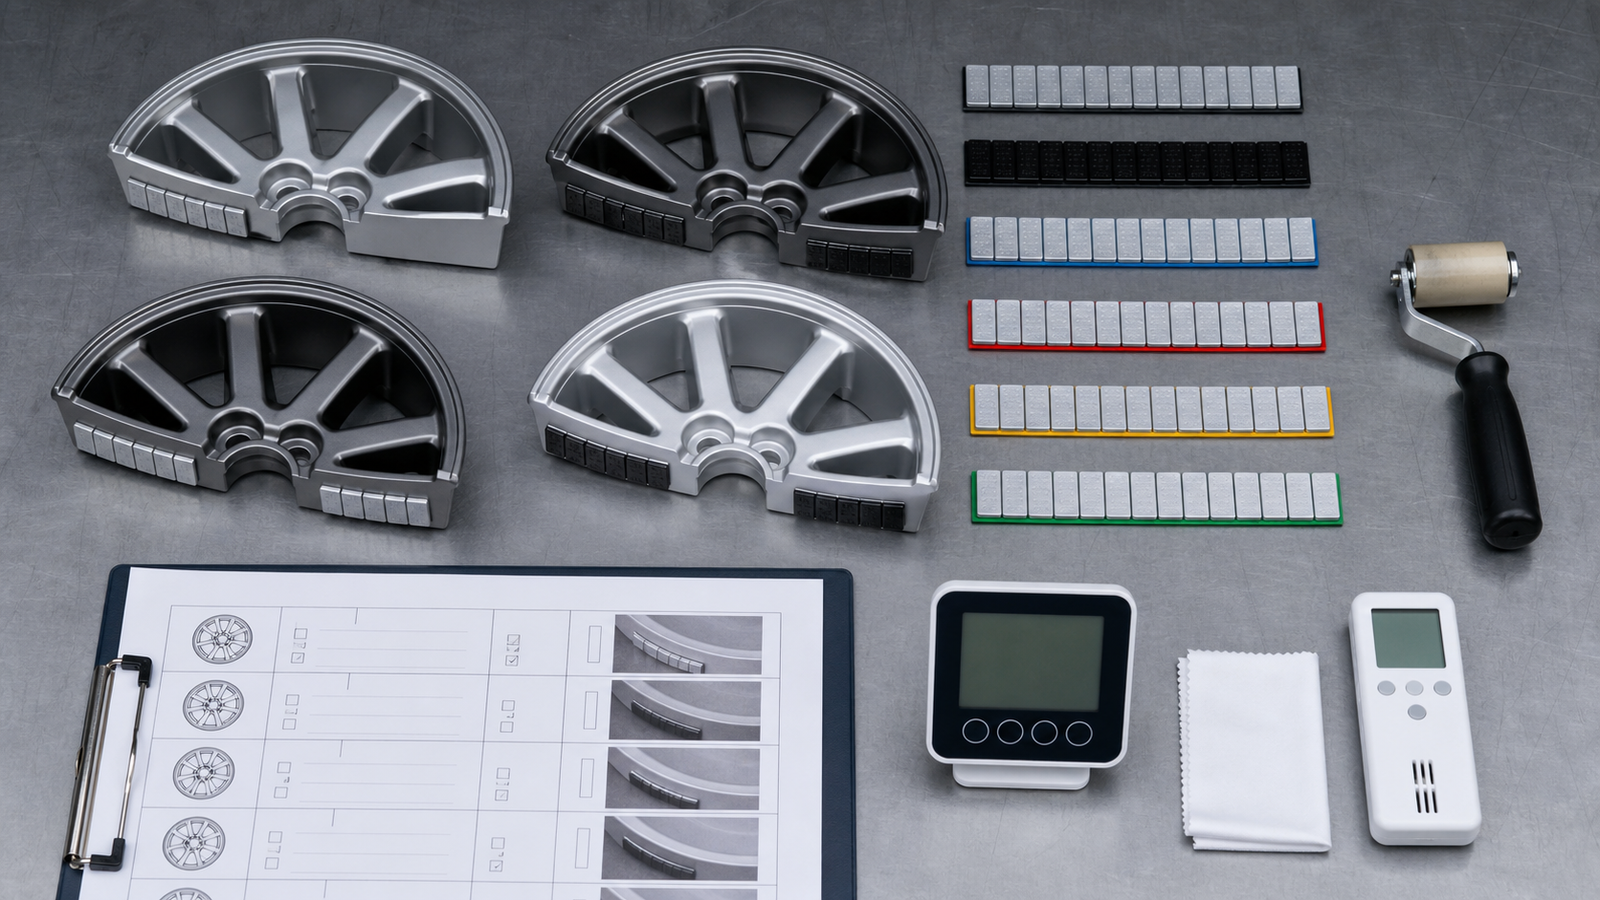
Acceptance criteria should be meaningful for the purchase. For one program, the buyer may require no visible edge lift on specified representative rims after the agreed observation period. Another may focus on comparable behavior across finishes, rebalancing success, or documented response to a challenging curved surface. State the criterion in plain language and avoid inventing a technical number that neither side can verify.
For a multi-SKU program, request common causes of adhesive weight loss and keep the final approval record with the product specification. It becomes a practical reference for repeat orders, onboarding, and complaint investigation.
Conclusion: Compare the process, not just the strip
A wheel weight adhesion test plan is credible when candidate samples are compared on the intended rim surface with documented preparation, conditions, placement, pressure, and observation. The goal is not to create a generic adhesive claim; it is to establish whether the proposed stick-on system works consistently in the buyer’s real wheel and workshop context.
Define the acceptance criteria before installation, retain the sample and lot record, and investigate different outcomes through the full process. For a new adhesive program, request tape data and representative samples, then build the approval decision from controlled evidence rather than a single demonstration.
Frequently Asked Questions
How many stick-on wheel-weight samples should a buyer test?
Test enough samples to cover the representative rims, finishes, and profiles that drive the purchase decision. The suitable quantity depends on the SKU range and risk; one strip on one flat surface is usually not enough for a wheel-specific approval.
Should buyers use a peel-strength number as the only acceptance criterion?
No. A number without the test method, rim surface, temperature, sample preparation, and acceptance context can be misleading. Combine any supplier data with controlled application evidence on representative wheels.
Can a test use a previously cleaned wheel?
Yes, if the surface condition is documented and the exact mounting lane is properly prepared for the new comparison. Remove old adhesive and contamination, then apply the same cleaning and drying process to every comparable sample.
What does edge lift during a test indicate?
It can indicate incomplete contact, contamination, insufficient pressure, unsuitable geometry, temperature effects, or a tape difference. Review the evidence and repeat a controlled comparison before assigning a root cause.
Should the wheel be balanced during an adhesion trial?
If the trial is intended to validate the actual service outcome, include the correct balancing procedure and recheck. If it is a surface-and-tape comparison only, keep the scope clear and do not treat it as proof of full balancing performance.
References
[1] 3M Wheel Weight System Application Guide. 3M, n.d. Accessed July 24, 2026.
[2] 3M Wheel Weight Surface Prep 2000, PN55453. 3M, n.d. Accessed July 24, 2026.