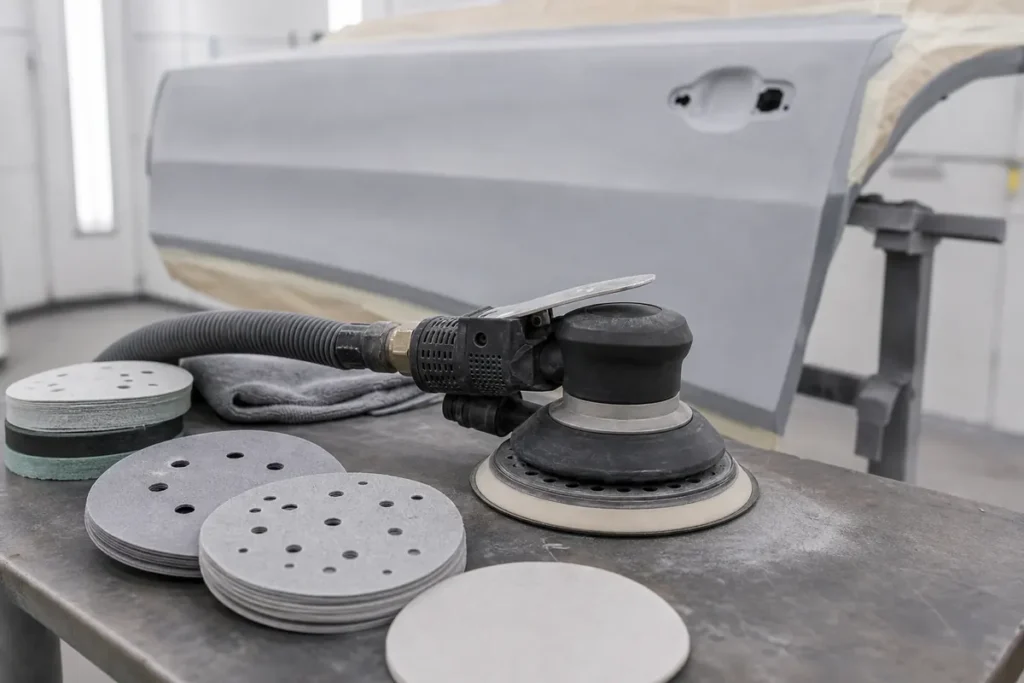
A DA sander, or dual-action sander, is an automotive sanding tool that moves the sanding pad in two actions at once: rotation and an offset orbital motion. That motion helps remove material quickly while reducing the straight-line scratches that a simple rotary tool can leave.
In auto body work, a DA sander is used for primer sanding, old paint preparation, featheredge work, surface leveling, and sometimes fine finishing with the right disc and pad. It is fast and useful, but it does not replace hand blocking when a repair must be shaped perfectly flat.
This guide explains how a DA sander works, when to use it on cars, what discs and grits fit it, and what mistakes to avoid.
Table of Contents
- What does DA sander mean?
- How does a dual-action sander work?
- When should you use a DA sander on a car?
- What sanding discs and grits work best with a DA sander?
- How is a DA sander different from hand sanding or a rotary sander?
- How do you use a DA sander without damaging paint or primer?
- What should buyers check before sourcing DA sanding products?
- Conclusion: Use the DA sander for speed, but keep control
- Frequently Asked Questions
- References
What does DA sander mean?
DA sander means dual-action sander. The tool spins and orbits the sanding disc at the same time, creating a random scratch pattern that is useful for automotive sanding.
A DA sander may be pneumatic or electric. Pneumatic models are common in collision repair shops because they are light and powerful when connected to a good air system. Electric models are useful where compressed air is limited. Both need the correct pad, disc, speed, and dust-control setup.
The related sanding disc guide explains the disc side of the system: hook-and-loop, PSA, mesh, hole pattern, disc size, and grit. A DA sander is only as good as the abrasive and pad attached to it.
| DA Sander Detail | Why It Matters on Cars |
|---|---|
| Rotation plus orbit | Spreads scratches so they are easier to refine before primer or paint |
| Pad size | Controls coverage, edge risk, and access around curved panels |
| Pad firmness | Changes whether the tool levels flatter or follows contours more softly |
| Dust extraction | Reduces clogging, heat, pigtails, and cleanup time |
How does a dual-action sander work?
A dual-action sander works by rotating the pad while the pad also moves in a small orbit. This spreads scratches in a more random pattern, helping the surface become evenly sanded without the obvious circular marks of a pure rotary motion.

The orbit size affects how the tool feels. A larger orbit removes material faster but can be more aggressive. A smaller orbit is better for fine finishing and control. Tool speed, pressure, disc grit, and pad firmness all change the final scratch pattern.
Random orbital sanding systems from major abrasive brands are built around tool motion, abrasive disc design, backing pads, and dust extraction because these parts work together 1. A good tool with a poor disc can still leave pigtails.
The pad is offset from the drive center, so the abrasive does not travel in one fixed circle. That is the useful part of the DA pattern: it breaks up the scratch direction while still giving the technician enough cutting speed for real panel preparation. The motion does not make the tool foolproof, though. If the pad is tilted, stalled, overloaded with pressure, or paired with a clogged disc, the scratch pattern can still become uneven.
When should you use a DA sander on a car?
Use a DA sander when the job needs faster, more uniform sanding over a panel area. It is common for old paint prep, primer surfacer sanding, feathered repair edges, filler refinement after rough shaping, and general surface preparation.
A DA sander is especially helpful on broad panels such as doors, hoods, roof sections, quarter panels, and fenders. It saves time compared with hand sanding and can leave a consistent scratch pattern before primer or paint.
It is not the best first tool for every situation. For blocking body filler flat, a hand block often gives better shape control. For edges, tight curves, and delicate clear coat correction, hand sanding or smaller tools may be safer. The related automotive sandpaper guide helps connect tool choice with abrasive format and surface stage.
What sanding discs and grits work best with a DA sander?
DA sanders usually work with hook-and-loop or PSA sanding discs in 3 inch, 5 inch, or 6 inch sizes. The best grit depends on whether the tool is shaping filler, sanding primer, preparing old paint, or refining a surface.
For filler refinement, a shop may use P80-P180 depending on the repair stage. For primer surfacer, P220-P400 is common. For paint preparation, P400-P600 may be used depending on the coating system. Fine finishing discs can move much higher when the tool and pad are appropriate.
For a complete grit sequence, the related sandpaper grit chart is the better reference. The key with a DA sander is to avoid skipping so far that the next grit cannot remove the previous scratch.
Dust extraction matters. Multi-hole discs, mesh discs, and matched backup pads help remove dust from the contact area. This reduces clogging, heat, and random scratches.
Pad firmness should match the task. A firm pad keeps the disc flatter for leveling primer or refining a repair, while a soft interface pad helps the abrasive follow curved panels with less edge cutting. The same P400 disc can feel aggressive on a hard pad and more forgiving on a soft interface. That is why shops often keep more than one pad setup for the same DA sander.
How is a DA sander different from hand sanding or a rotary sander?
A DA sander is faster than hand sanding and safer for general sanding than a pure rotary sander, but hand sanding still gives better shape reading and edge control. Each tool has its place.

Hand sanding with a block is slower, but it helps reveal highs, lows, waves, and body shape. It is important for filler and primer leveling. A rotary sander spins in one direct motion and can remove material quickly, but it can leave more obvious swirl marks or heat damage if used carelessly.
The DA sander sits between them. It is efficient, less likely to create a single circular scratch pattern, and practical for large areas. But it can still round edges, overheat coatings, or create pigtails if the disc is dirty or the pad is tilted.
How do you use a DA sander without damaging paint or primer?
Use a DA sander with light to moderate pressure, a flat pad, a clean disc, steady movement, and dust extraction where possible. Let the abrasive cut instead of forcing the tool.

Keep the pad flat when sanding broad areas. Avoid tilting onto the edge of the disc unless the tool and operation are specifically intended for that. Move evenly and overlap passes. Stop often to inspect the surface instead of sanding blindly.
Use the correct pad firmness. A firm pad cuts flatter on primer and filler, while a soft interface pad follows curves and reduces edge pressure. For water, slurry, and dust-method choices, the related wet sanding vs dry sanding guide helps separate dry primer work from fine wet finishing.
Safety matters too. Dry sanding can create dust that needs extraction, ventilation, and appropriate PPE. OSHA’s autobody repair guidance covers sanding and refinishing hazards, including dust and respiratory protection concerns 4.
What should buyers check before sourcing DA sanding products?
Buyers should check disc compatibility, pad quality, hole pattern, grit consistency, dust extraction fit, tool balance, vibration, packaging, and batch repeatability. DA sanding products work as a system, so one weak part can affect the finish.
For abrasive discs, test attachment strength, cut rate, clog resistance, and scratch consistency. For pads, check hook strength, flexibility, edge durability, and hole alignment. For tools, check vibration, speed control, dust port fit, and operator comfort.
The automotive sandpaper and abrasives category is the practical Yirox starting point for sanding discs and related abrasive products. Yirox Team sample checks usually focus on real-panel sanding feel, disc attachment, hole pattern accuracy, carton protection, label clarity, and whether repeat batches match the approved sample.
For DA-related sourcing, it is useful to test complete combinations instead of isolated items. A disc that performs well on one backup pad may clog or vibrate on another. A hole pattern that looks correct in photos may not extract dust well if the pad or vacuum path is mismatched. Real-panel testing catches these compatibility issues before they become customer complaints.
Conclusion: Use the DA sander for speed, but keep control
A DA sander is one of the most useful sanding tools in auto body work because it combines speed with a random orbital scratch pattern. It is excellent for primer, old paint preparation, feathering, and large-area sanding.
It is not a magic tool. The finish still depends on grit, disc quality, pad choice, dust control, technique, and the surface being repaired. Hand blocking still matters when flatness and body shape are the priority.
Use the DA sander where it saves time, use hand tools where they give better control, and always match the abrasive system to the next coating or finishing step.
Frequently Asked Questions
Is a DA sander the same as an orbital sander?
A DA sander is a type of random orbital sanding tool that combines rotation and orbit. Many people use the terms loosely, but in auto body work DA usually refers to a dual-action tool used with sanding discs.
Can a DA sander remove car paint?
Yes, a DA sander can remove paint with the correct abrasive, but it should be used carefully. Coarse discs can remove material quickly and may damage edges or thin panels if misused.
What grit should I use with a DA sander on primer?
Primer sanding often uses grits such as P220-P400, depending on the primer build and next coating. Follow the paint system recommendation when available.
Is a DA sander good for clear coat?
A DA sander can be used for some fine finishing with the right disc and pad, but clear coat work requires careful grit choice, light pressure, and polishing afterward. Hand wet sanding may be safer for small defects.
Why does my DA sander leave pigtails?
Pigtails often come from dust, clogged discs, too much pressure, poor extraction, a damaged pad, or contamination under the disc. Clean the surface and change discs before they stop cutting cleanly.
References
[1] 3M. (2026). *Random Orbital and Automotive Sanding Systems*.
[2] Mirka. (2026). *Dust-Free Sanding Tools and Automotive Refinishing*.
[3] Norton Abrasives. (2026). *Sanding Tool and Abrasive Selection Guidance*.
[4] OSHA. (2026). *Autobody Repair and Refinishing Safety and Health Topics*.