Feathering in auto body work means sanding the edge of paint, primer, filler, or repaired material so it tapers smoothly into the surrounding surface. A proper featheredge removes the hard step that would otherwise show through primer, sealer, base coat, or clear coat.
Feather sanding is a small operation with a big effect. If the repair edge is sharp, paint can bridge over it and later reveal a visible ring, mapping line, or texture change. If the edge is over-sanded, the repair can grow too large or lose important shape. Good feathering is controlled, gradual, and easy for the next coating step to cover.
This guide explains what feathering means, how to feather sand paint edges, which grits and tools are commonly used, and what buyers should check when sourcing abrasives for collision repair and refinishing.
Table of Contents
- What does feathering mean in auto body repair?
- Why do paint edges need to be feather sanded?
- How do you feather sand a paint edge step by step?
- What sandpaper grit should you use for feathering?
- Should you feather edges by hand or with a DA sander?
- How can you tell whether the featheredge is good enough?
- What mistakes cause edge mapping or visible repair lines?
- What should buyers check before sourcing feather sanding abrasives?
- Conclusion: Feathering hides the repair edge before paint does
- Frequently Asked Questions
- References
What does feathering mean in auto body repair?
Feathering means sanding a repair edge into a thin, gradual transition. Instead of leaving a hard ledge between paint layers, the technician creates a smooth taper that primer and paint can cover evenly.

On a repaired panel, there may be several surfaces meeting in one area: bare metal, body filler, old primer, old paint, new primer, and surrounding clear coat. Each layer has thickness. If a hard edge remains, it can print through later coatings after the repair cures, shrinks, or is sanded.
Feathering does not mean randomly sanding the entire area thin. It means intentionally blending the edge. The transition should be wide enough that the fingertip does not catch it and the next primer coat does not have to hide a sharp wall.
Collision repair training and refinishing systems often treat featheredge quality as part of proper surface preparation because the coating system depends on the shape and cleanliness of the surface below it 1.
Why do paint edges need to be feather sanded?
Paint edges need feather sanding because coatings do not hide sharp steps well. A hard edge can create mapping, lifting, poor adhesion, visible rings, or a repair outline after primer, base coat, or clear coat is applied.
When a scratch, chip, filler patch, or sand-through is repaired, the surrounding coating layers are exposed. If the technician simply primes over a sharp edge, the primer may shrink around that edge. After sanding and painting, the line can appear again as a faint halo.
Feathering also helps adhesion. A properly sanded taper gives the next coating a clean mechanical surface. It reduces the chance that paint will bridge over an edge without bonding well. The result is not only better appearance but also a more stable repair.
The idea is similar whether the repair is small or large. A stone chip, filler repair, old paint breakthrough, and primer edge all need a transition that the next material can cover.
How do you feather sand a paint edge step by step?
Feather sanding starts by cleaning the panel, identifying the edge, choosing a controlled abrasive, sanding outward in gradual passes, and checking the transition by touch and sight. The goal is a smooth taper, not a larger damaged area.

Start by cleaning the repair area so dust, wax, silicone, or residue does not contaminate the abrasive. Mark or visually identify the hard edge. If the edge is a paint chip or sand-through, look for where each layer begins and ends.
Use light pressure and keep the abrasive moving. Sand from the damaged area outward, widening the transition gradually. Do not dig directly into the edge with the corner of a disc or block. That creates grooves instead of a smooth taper.
Stop often and wipe the panel. Feel the transition with a clean hand. Many technicians use guide coat or contrasting dust to reveal hard edges and scratches. If the guide coat remains in a ring, the edge is not blended yet.
After the edge is feathered, refine the scratch with the next grit before applying primer or sealer. If the surface still has coarse scratches, primer may fill them at first but shrink later and reveal them. For method choice, the related wet sanding vs dry sanding guide explains how dry dust feedback and wet slurry affect visibility and cleanup.
What sandpaper grit should you use for feathering?
Feathering often starts with a medium grit for shaping the edge and then moves to finer grits before primer or paint. The exact grit depends on the repair stage, coating system, substrate, and whether the next product can cover the scratch.
| Feathering Stage | Common Grit Range | Purpose | Watch Out For |
|---|---|---|---|
| Initial edge shaping | P180-P240 | Remove the hard step | Deep scratches if pressure is high |
| Primer preparation | P240-P320 | Refine repair edge | Skipping from coarse grit too soon |
| Final prep before sealer or paint | P400-P600 | Smooth surrounding area | Over-sanding edges |
| Fine finishing | P800 and finer | Small spot or blending prep | Not enough bite for some coatings |
For a broader grit overview, the related sandpaper grit chart explains how coarse, medium, fine, and ultra-fine grits behave in automotive work. The related automotive sandpaper guide is useful when deciding between sheets, discs, wet/dry paper, foam-backed abrasives, and finishing products.
Do not choose grit by habit alone. If the next coating is primer surfacer, it may tolerate a different scratch than base coat or sealer. Always follow the coating system’s technical guidance when available.
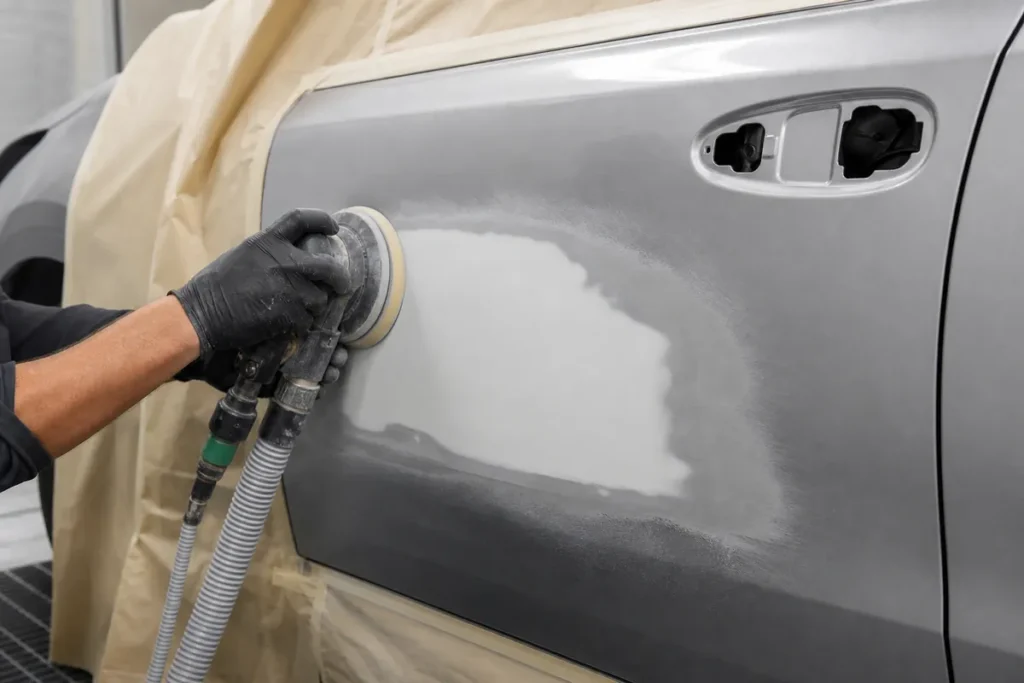
Should you feather edges by hand or with a DA sander?
You can feather edges by hand or with a DA sander, but each method has a different strength. Hand sanding gives better feel and edge control, while a DA sander is faster on larger areas when used carefully.
A DA sander can feather old paint and primer edges efficiently, especially on broad panels. The related DA sander guide explains why orbit size, pad flatness, and pressure affect scratch pattern and edge control. If the abrasive is a disc, the related sanding disc guide helps with backing, hole pattern, and attachment choices.
Hand sanding is slower but valuable near body lines, curved edges, small repairs, and delicate transitions. A small block or folded abrasive can help the technician feel the edge. Bare fingers alone can create uneven pressure, so a backing pad or block is often better.
The safest approach is often mixed. Use a DA sander to prepare the larger surrounding area, then hand refine the edge or shape-sensitive zones. The tool should support the repair, not force the repair to fit the tool.
How can you tell whether the featheredge is good enough?
A good featheredge feels smooth, looks gradual, and does not show a hard ring after wiping, guide coat, or primer inspection. If your fingernail catches a step, the edge is probably not ready.
Use both sight and touch. Under direct light, the transition should not have a sharp shadow line. Under guide coat, the edge should disappear gradually instead of leaving a dark ring. After cleaning, coarse scratches should not remain where finer preparation is required.
Primer can help reveal mistakes. If the edge maps through primer, do not assume more topcoat will hide it. Sand, refine, and reprime as needed. It is better to correct the edge early than to see the repair outline after base coat and clear coat.
Panel shape matters too. On a curved fender or door edge, a repair can look smooth from one angle and poor from another. Inspect across the panel, not only straight at the repair.
What mistakes cause edge mapping or visible repair lines?
Visible repair lines usually come from a hard edge, coarse scratches, poor cleaning, weak primer build, solvent swelling, or sanding too aggressively in one small area. The cause is often hidden below the final paint layer.
One common mistake is stopping the featheredge too narrow. The repair edge may look acceptable before primer, but the coating stack still has a steep transition. A wider, smoother taper gives primer a better surface to cover.
Another mistake is polishing or priming over a contaminated edge. Wax, silicone, dust, or old residue can interfere with adhesion and cause visible defects later. Cleanliness is part of feathering, not a separate afterthought.
Sanding dust also matters. Dry sanding can create airborne dust and fine residue that should be controlled with extraction, ventilation, and suitable PPE. OSHA’s autobody repair guidance treats sanding and refinishing hazards as important shop safety topics 3, and NIOSH has published dust-control guidance for autobody sanding 4.
What should buyers check before sourcing feather sanding abrasives?
Buyers should check grit consistency, backing flexibility, cut control, clog resistance, scratch uniformity, disc attachment, packaging, and batch repeatability. Feather sanding needs predictable abrasives because one random deep scratch can show through later.
Sample testing should include real primer and old paint edges. Test how the abrasive cuts at the edge, whether it loads with paint, whether it tears on curves, and whether the next grit removes the scratch cleanly. A product that works on a flat test coupon may behave differently around repair edges.
The automotive sandpaper and abrasives category is a practical Yirox starting point for sanding sheets, discs, and related products. Yirox Team sample checks usually focus on cut feel, scratch consistency, backing strength, package labeling, and whether delivered batches match approved samples.
For distributors, packaging clarity matters too. Feather sanding often uses multiple grits in quick sequence. If grit labels are confusing or mixed, shops can accidentally create scratches the next step cannot remove.
Conclusion: Feathering hides the repair edge before paint does
Feathering is the process of sanding a paint or repair edge into a gradual taper so primer, sealer, base coat, and clear coat do not reveal a hard line later. It is simple in concept, but it depends on grit choice, pressure control, tool selection, cleanliness, and inspection.
Use enough abrasive to remove the hard step, then refine the scratch so the next coating can cover it. Choose hand sanding for feel and a DA sander for controlled speed on larger areas. For buyers, the best feather sanding abrasive is predictable, clean-cutting, and consistent from batch to batch.
Frequently Asked Questions
What is a featheredge in auto body work?
A featheredge is a smooth tapered transition between paint layers, primer, filler, or substrate. It removes the hard edge that could show through later coatings.
Can you feather paint edges with a DA sander?
Yes, a DA sander can feather paint edges on larger areas when used with light pressure and the right disc. Hand sanding may still be safer near body lines, tight curves, and delicate edges.
What grit is best for feathering paint?
Many repairs use a progression such as P180-P240 for initial edge shaping and P320-P600 for refinement, depending on the next coating. Always match the grit to the paint system and repair stage.
Why does a repair edge show after painting?
The edge may show because it was not feathered wide enough, coarse scratches remained, primer shrank, or contamination affected the surface. A visible ring usually means the problem started before topcoat.
Should feather sanding be wet or dry?
Both methods can be used, but dry sanding is common for repair shaping because dust and guide coat make the surface easier to read. Wet sanding can help with fine finishing and dust control, but slurry can hide some details.
References
[1] I-CAR. *Collision repair refinishing and featheredge guidance*.
[2] 3M. *Automotive sanding and surface preparation systems*.
[3] OSHA. *Autobody repair and refinishing hazards*.
[4] NIOSH. *Dust control in autobody sanding*.